Ubuntu 16.04 has been out since a long time, but it is still one of the most used server system for several projects out there (always patched).
One of the most common activities on these systems, especially when you have to reinstall all from scratch for a clean fresh feel, is to configure static IP addresses.
Doing this can be problematic (made worse by the fact that even the official Ubuntu LTS documentation doesn’t give correct advice), particularly when it comes to DNS resolution, and in most cases, a very-old-school habit of blindly wanting to edit directly the /etc/resolv.conf file which you really should not be doing any more these days.
Edit the /network/interfaces file
sudo nano /etc/network/interfaces
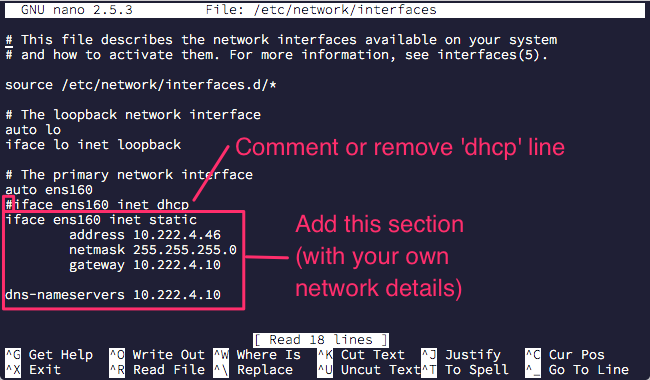
The interfaces file is where you need to change from the default dhcp setting to add some information about the static IP address that you want to configure.
In this case, look for the line in the file that says # The primary network interface and directly beneath this you’ll see something like (the default DHCP configuration):
auto ens160
iface ens160 inet dhcp
If you’ve been using previous versions of Ubuntu you might have noticed that the interface name above ens160 looks a bit odd. It used to be called eth0 or eth1, but as from Ubuntu 15.10 the interface name is now allocated based on a few other factors.
Simply comment, remove or edit the line that says ends with dhcp and add the following information (here’s an example only), accordingly to your subnet and network configuration:
ifaceinet static address 192.168.0.100 netmask 255.255.255.0 gateway 192.168.0.1
Next you’ll want to add the nameservers (DNS) by adding the line dns-nameservers followed by a list of IP addresses. A lot of people use Google’s public DNS (8.8.8.8 or 8.8.4.4), or, if you have details from your service provider about DNS resolution, use them instead.
dns-nameservers 8.8.8.8 8.8.4.4
NOTE: Double-check the file again, and ensure all details are correct, before proceeding. If you are configuring a remote system you could easily cut yourself off if you get it wrong.
Save the file, and you’re done.
Restart the networking service (or reboot)
Once you are confident the change has been made, and if you don’t want to reboot you can just restart the networking service.
sudo /etc/init.d/networking restart
After doing this, and provided you don’t get any errors, your primary network interface should now be configured with the static IP address details you have provided.
Take note that a reboot will also do the trick quite nicely. You can check with a ifconfig -a to see the change.
sudo reboot
At this step you should now have your system assigned with the correct IPv4 addressing.
 |