To totally unlock this section you need to Log-in
Login
Testing network performance in terms of speed and bandwidth is a norm in both production and non-production environment.
A detailed report of speed and bandwidth analysis is very much necessary for the deployment of network dependent application servers. Also sometimes you need to double check the speed of your network throughput while troubleshooting. All these requires a reliable network performance testing tool. This post will be concentrating on one such tool called as "iperf".
IPERF is an open source tool that can be used to test network performance. Iperf is much more reliable in its test results compared to many other online network speed test providers.
An added advantage of using IPERF for testing network performance is the fact that, it is very reliable if you have two servers, both in geographically different locations, and you want to measure network performance between them.
How to install iperf?
Installing iperf is very much easy, if you have epel yum repository enabled (in RedHat system's).

Installing iperf from source is also very much easy. Just download the iperf source package from Iperf Source Package
And do a normal source installation steps as follows.
#tar -xvf iperf-2.0.5.tar.gz
The above command will extract the tar package You downloaded from the above link.
Now get inside the extracted directory and run the below command to configure, with the default options.
[root@slashroot2 ~]# cd iperf-2.0.5
[root@slashroot2 iperf-2.0.5]# ./configure
Now lets compile it with "make" command, and then install it using "make install" command.
[root@slashroot2 iperf-2.0.5]# make
[root@slashroot2 iperf-2.0.5]# make install
How to install iperf in windows machine?
Installing iperf in Windows is also quite easy. Lets see how.
You can download iperf for Windows from Iperf For Windows. Now unzip this zip file to a folder named "iperf" and run the iperf.exe inside that directory.
For example, we have extracted the iperf zip archive in C:\iperf directory, so will open the Windows CMD, and navigate to that directory, to run the iperf.exe command.
C:\>cd C:\iperf
C:\iperf>iperf.exe
How to test the network speed between one windows machine and a linux machine?
As we told before, iperf can be used to perform speed test between remote machine's. It works in a client server model.
NOTE: the operating system does not matter, while you are using iperf. The commands for using iperf on windows is exactly the same as in linux. And also other operating system. Normally in the test environment, iperf client sends data to the server for the test.
Before going ahead with the test, lets understand some networking concepts related to speed test.
Network Throughput
Transfer rate of data from one place to another with respect to time is called as throughput. Throughput is considered a quality measuring metric for hard disks, network etc. It's measured in Kbps (Kilo bits per second), Mbps (Mega bits per second), Gbps (Giga bits per second).
TCP Window
TCP (Transmission Control Protocol), is a reliable transport layer protocol used for network communications. How TCP works, is beyond the scope of this article. TCP works on a reliable manner, by sending messages and waiting for acknowledgement from the receiver.
Whenever two machine's are communicating with each other, then each of them will inform the other, about the amount of bytes it is ready to receive at one time.
In other words, the maximum amount of data that a sender can send the other end, without an acknowledgement is called as Window Size. This TCP window size affects network throughput very badly sometimes. Lets take an example.
Suppose you want to send a 500MB of data from one machine to the other, with the tcp window size of 64KB.
Which means for sending the whole 500MB data, the sending machine has to wait 800 times for an acknowledgement from the receiver.
500MB / 64KB = 800
So you can clearly see that, if you increase the Window size a little bit to tune TCP, it can bring significant difference to the throughput achieved.
Suppose you have a windows machine and want to measure the speed between it and another Linux machine, then you need to make one as client, and another as the server. Lets see how.
We will make our Windows machine the server and the Linux machine as the client:
C:\iperf>iperf.exe -s
------------------------------------------------------------
Server listening on TCP port 5001
TCP window size: 64.0 KByte (default)
------------------------------------------------------------
-S argument is used for specifying server.
The above command, starts iperf server on the Windows machine, and it by default runs on the port 5001 by default.(It also reports that the default TCP window size is 64.0KB).
Lets test the throughput from the Linux client machine, as shown below:
[root@slashroot2 ~]# iperf -c 192.168.0.101
------------------------------------------------------------
Client connecting to 192.168.0.101, TCP port 5001
TCP window size: 16.0 KByte (default)
------------------------------------------------------------
[  3] local 192.168.0.102 port 47326 connected with 192.168.0.101 port 5001
[ ID] Interval       Transfer     Bandwidth
[  3]  0.0-10.0 sec   308 MBytes   258 Mbits/sec
From the above output, you can see that we got a speed of 258Mbits/sec. The ouput shows something more.
Interval: Interval specifies the time duration for which the data is transferred.
Transfer: All data transferred using iperf is through memory, and is flushed out after completing the test. So there is no need to clear the transferred file after the test. This column shows the transferred data size.
Bandwidth: This shows the rate of speed with which the data is transferred.
You can start your iperf server on your desired port with the following method.
C:\iperf>iperf.exe -s -p 2000
------------------------------------------------------------
Server listening on TCP port 2000
TCP window size: 64.0 KByte (default)
------------------------------------------------------------
Also you can tell the client to connect to your desired server port and also tweak some more connection and reporting parameter's as shown below.
root@slashroot2 ~]# iperf -c 192.168.0.101 -t 20 -p 2000 -w 40k


------------------------------------------------------------
Client connecting to 192.168.0.101, TCP port 2000
TCP window size: 80.0 KByte (WARNING: requested 40.0 KByte)
------------------------------------------------------------
[  3] local 192.168.0.1[02 port 60961 connected with 192.168.0.101 port 2000
[ ID] Interval       Transfer     Bandwidth
[  3]  0.0-20.0 sec  1.74 GBytes   747 Mbits/sec
-t option used in the above command tells to transfer data for 20 seconds, while -p will tell the client to connect the port 2000 on the server.
-w will specify your desired window size value. As i told before, window size tuning will improve TCP transfer rate to a certain extent.
And you can clearly see from the above output that the bandwidth for the whole transfer has increased, as we have increased the window size (we are using two virtual machine's in one physical box for this iperf demonstration, which is the reason we are getting exceptional transfer rate's).
You can also tell the iperf client to show the transfer rate at an interval of 1 second, for the whole 10 second transfer, as shown below with -i option.
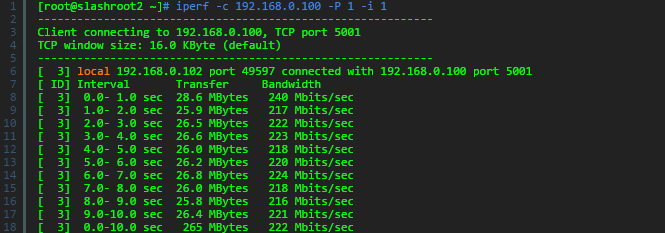
Until now we have only seen the throughput of one TCP connection. Because when you run iperf, by default if only creates one TCP connection with the remote server.
NOTE: you Might have noticed that some internet Download manager's are so fast while they download any content from the internet, compared to the normal operating system downloader. The main reason behind it is the fact that they work on "Parallel TCP connections". One such download manager, that we remember is "Internet Download Manager".
Let's check the throughput report by increasing the number of parallel connections using "iperf".
[root@slashroot2 ~]# iperf -c 192.168.0.100 -P 20
------------------------------------------------------------
Client connecting to 192.168.0.100, TCP port 5001
TCP window size: 16.0 KByte (default)
------------------------------------------------------------
[ 15] local 192.168.0.102 port 57258 connected with 192.168.0.100 port 5001
[  3] local 192.168.0.102 port 57246 connected with 192.168.0.100 port 5001
[  4] local 192.168.0.102 port 57247 connected with 192.168.0.100 port 5001
[  5] local 192.168.0.102 port 57248 connected with 192.168.0.100 port 5001
[  7] local 192.168.0.102 port 57250 connected with 192.168.0.100 port 5001
[  6] local 192.168.0.102 port 57249 connected with 192.168.0.100 port 5001
[ 10] local 192.168.0.102 port 57253 connected with 192.168.0.100 port 5001
[  8] local 192.168.0.102 port 57251 connected with 192.168.0.100 port 5001
[  9] local 192.168.0.102 port 57252 connected with 192.168.0.100 port 5001
[ 16] local 192.168.0.102 port 57259 connected with 192.168.0.100 port 5001
[ 19] local 192.168.0.102 port 57261 connected with 192.168.0.100 port 5001
[ 18] local 192.168.0.102 port 57260 connected with 192.168.0.100 port 5001
[ 20] local 192.168.0.102 port 57262 connected with 192.168.0.100 port 5001
[ 17] local 192.168.0.102 port 57263 connected with 192.168.0.100 port 5001
[ 21] local 192.168.0.102 port 57264 connected with 192.168.0.100 port 5001
[ 11] local 192.168.0.102 port 57254 connected with 192.168.0.100 port 5001
[ 12] local 192.168.0.102 port 57255 connected with 192.168.0.100 port 5001
[ 13] local 192.168.0.102 port 57256 connected with 192.168.0.100 port 5001
[ 14] local 192.168.0.102 port 57257 connected with 192.168.0.100 port 5001
[ 22] local 192.168.0.102 port 57265 connected with 192.168.0.100 port 5001
[ ID] Interval       Transfer     Bandwidth
[  8]  0.0-10.6 sec  16.6 MBytes  13.1 Mbits/sec
[ 16]  0.0-10.6 sec  16.6 MBytes  13.1 Mbits/sec
[ 18]  0.0-10.6 sec  16.5 MBytes  13.1 Mbits/sec
[ 17]  0.0-10.7 sec  16.6 MBytes  13.0 Mbits/sec
[ 21]  0.0-10.7 sec  15.6 MBytes  12.3 Mbits/sec
[ 12]  0.0-10.7 sec  17.5 MBytes  13.7 Mbits/sec
[ 22]  0.0-10.7 sec  16.6 MBytes  13.0 Mbits/sec
[ 15]  0.0-10.8 sec  17.8 MBytes  13.8 Mbits/sec
[  3]  0.0-10.7 sec  18.5 MBytes  14.5 Mbits/sec
[  4]  0.0-10.8 sec  18.1 MBytes  14.1 Mbits/sec
[  5]  0.0-10.7 sec  17.6 MBytes  13.9 Mbits/sec
[  7]  0.0-10.8 sec  18.4 MBytes  14.3 Mbits/sec
[  6]  0.0-10.8 sec  17.0 MBytes  13.2 Mbits/sec
[ 10]  0.0-10.8 sec  16.8 MBytes  13.1 Mbits/sec
[  9]  0.0-10.8 sec  16.8 MBytes  13.0 Mbits/sec
[ 19]  0.0-10.6 sec  16.5 MBytes  13.0 Mbits/sec
[ 20]  0.0-10.7 sec  16.5 MBytes  12.9 Mbits/sec
[ 11]  0.0-10.7 sec  18.0 MBytes  14.0 Mbits/sec
[ 13]  0.0-10.7 sec  17.8 MBytes  13.9 Mbits/sec
[ 14]  0.0-10.8 sec  18.2 MBytes  14.1 Mbits/sec
[SUM]  0.0-10.8 sec   344 MBytes   266 Mbits/sec
In the above shown example i have told iperf client to create 20 parallel TCP connections to the remote host while the data transfer. And if observe the output, you can see clearly that 20 different ports on the client is connected to the default 5001 port on the server.
And all of the connections had different transfer rate, and at the end we got a combined throughput of 266Mbits/s.(Which is much better that a single TCP connection).
Conducting a UDP speed test in iperf
Conducting a UDP speed test using iperf will provide you with a couple of more information about your network which will be very much useful in finding network bottlenecks.
As we discussed before, not only TCP window size but network parameter's like the following also affects the throughput achieved during a connection.
- Out of order delivery
- Network Jitter
- Packet loss out of total number of packets
For conduction an iperf udp test, you need to start the server with the -u option so that the UDP port 5001 is opened on the server side.
C:\iperf>iperf.exe -s -u
------------------------------------------------------------
Server listening on UDP port 5001
Receiving 1470 byte datagrams
UDP buffer size: 64.0 KByte (default)
------------------------------------------------------------
Now lets start the data transfer from the client side by sending UDP traffic.
[root@slashroot2 ~]# iperf -c 192.168.0.100 -u -b 100m
------------------------------------------------------------
Client connecting to 192.168.0.100, UDP port 5001
Sending 1470 byte datagrams
UDP buffer size:  107 KByte (default)
------------------------------------------------------------
[  3] local 192.168.0.102 port 50836 connected with 192.168.0.100 port 5001
[ ID] Interval       Transfer     Bandwidth
[  3]  0.0-10.0 sec  97.4 MBytes  81.7 Mbits/sec
[  3] Sent 69508 datagrams
[  3] Server Report:
[  3]  0.0-10.0 sec  97.4 MBytes  81.8 Mbits/sec   0.167 ms   49/69507 (0.07%)
[  3]  0.0-10.0 sec  1 datagrams received out-of-order
[root@slashroot2 ~]#
In the above example, we have used -b option to specify the bandwidth to use(because by default iperf UDP only used 1Mbps, we will recommend using your full available bandwidth to get an idea).
-u option needs to be also used on the client side for specifying UDP traffic.
The ouput tells us the following information:
- Bandwidth = 81.7Mbits/sec
- Network jitter = 0.167 ms (network jitter is the deviation in time for periodic arrival of data gram's. If you are doing the test with server's on the other side of the globe, then you might see higher jitter values in iperf output.)
- Out of Order = 1 datagram
- Lost/Total = 49/69508
0.07 percent datagram loss is not at all significant, in fact you can say that you got a nice network packet loss ratio.
VOIP require's a very less datagram loss because it's voice communication. A high datagram loss can drop the call altogether. So UDP testing with iperf will be very much helpful if you have VOIP or other such critical applications on your infrastructure.
You can get all the option's related to iperf with the following command.
[root@slashroot2 ~]# iperf --help
 |  |