To totally unlock this section you need to Log-in
Login
When you've finished using your computer, you probably turn them off. Millions of people do this everyday, but the next morning you’ll re-open everything including applications and saved documents, reposition application windows, and get everything back the way you had it. Leaving the computer on for 24 hours-a-day is not a good solution.
Windows OS provides three options for conserving power when you are not using the PC. These options include Sleep, Hibernate and Shut Down.
In contrast Apple Menu has only two options: Sleep and Shut down... Even though there is no menu option for hibernation, Mac’s can hibernate. It either occurs during normal sleep or if you intentionally set it up through Terminal.
Sleep Mode: The computer cuts the energy from all the components—disk, display, ports, and more—except for RAM as this is where the current desktop settings, open documents and applications are kept stored. In the event of power failure, any data stored in RAM get’s lost too. The benefit of sleep is that it allows you to resume the computer almost instantly.
Hibernate Mode: It writes all active data to the disk and then switches off the components as if the computer were fully turned off. You can cut the power of a system in hibernation, since it does not pose any risk to your data. Once the computer is powered back on it reads the data from disk and sends them back to RAM—this process can take few seconds to minutes. The data is restored to the point at which they entered hibernation.
Reasons for Using Sleep or Hibernation
Sleep lets you quickly resume work at the cost of some power. Hibernate is like shutting down your computer, but you can still resume your work from the previous session. A one-size fit all approach to computer power management is not appropriate in all situations. Each of these options has its own advantages and disadvantages.
Smart power management starts with understanding of various states in operating system and how they affect energy consumption. Analyzing the usage pattern,at what time and how much, is also helpful.
When to Sleep: Sleep is particularly useful if you’re stepping away from the computer for a small period. You can put the computer to sleep to save electricity and battery power. The computer will always be ready to use when you need it. If you open and close lid quite often or you’re running around various conference rooms and meetings then sleep is indeed a useful option.
When to Hibernate: Hibernation uses the least amount of power. If you won't be using the computer for an extended period of time—let’s say, you’re going to sleep, or you want conserve every little bit of power while on a trip or flight then you might want to hibernate the computer to save electricity and battery power. Restarting will be a little slower than in sleep mode, but the energy savings will be greater.
Different Behaviour of Sleep States in Mac OS X
Computers and operating systems have been designed to go into, what is commonly known as, sleep states to reduce power consumption when the machine is in a powered-on state but then goes idle.
Macs support a number of sleep states including the good old normal sleep and some special states such as Standby and Safe Sleep. To put a Mac to sleep immediately, do one of the following:
- Close the lid of the MacBook
- Press the power button on the Mac—tapping the power button makes both MacBooks and iMacs or Mac minis drop off to sleep instantly
- Choose Sleep from the Apple menu
- Press the Command-Option and Media key simultaneously
When the Mac goes to sleep, not just into idle mode or display sleep, the following things happen:
On all Macs:
- The microprocessor goes into a low-power mode.
- Video output is turned off, and a connected display may turn off or enter its own idle state.
- Apple-supplied hard disks spin down.
On laptops:
- The Ethernet port turns off, if applicable.
- Expansion card slots turn off.
- An AirPort card or built-in modem, if present, turns off.
- Optical media drive, if present, spins down.
- Audio input and output turns off.
- Keyboard backlit illumination, turns off.
The computer will continue to power RAM in sleep mode, so that whatever was in RAM when the computer went to sleep will still be there when the computer wakes. This also means that computers with more RAM use slightly more power in sleep mode. This is the default sleep mode for all desktop Macs.
Another sleep state found in Macs is safe sleep. It puts the contents of the RAM onto the hard disk each time you put it to sleep. In the event the battery begins to run low while sleeping or is left idle for long time, you won’t lose any work. Instead the machine enters a hibernation mode, whereby it’s using very little power at all.
When you connect the Mac to AC power, safe sleep will read the contents of the disk back to RAM, letting you come right back where you left off - with open applications and documents intact.
When waking from safe sleep, a progress indicator appears indicating the previously stored contents of memory are being read from the disk, and copied back into RAM. Most recent Mac’s support safe sleep including all Intel-based Macs and Power-PC based Macs sold after October 2005 1. Safe sleep is the default sleep mode for all laptops. If FileVault2 is enabled, the safe sleep-wake process is preceded by the FileVault2 authentication unlock screen.
Mac computers also have power standby features that further conserve energy. If the computers are manufactured in 2013 or later then standby mode will begin after three hours of normal sleep. Earlier models enter standby after just over an hour of normal sleep.
When that happens, the contents of RAM are written to disk and the RAM is powered down to further extend battery life. Standby also extends how long a laptop can stay asleep on battery power.
To enter standby mode, a desktop should have no external media mounted (USB, SD cards or Thunderbolt storage) while a laptop should be running on battery power with no external or network connections (Ethernet, USB, Thunderbolt, Bluetooth, and so on). Unlike safe sleep, Mac computers in standby mode do not need to be restarted and can be woken by a simple interaction with the keyboard or mouse.
Power Management Settings in Mac OS X
The Energy Saver preference pane controls how a Mac responds to inactivity. You can use them to control the computer’s energy use. Although the controls are bit different on a laptop as compared to desktop, they are quite easy to setup. The Mac meets the Energy Star program requirements for energy efficiency. Reducing energy consumption saves money and helps conserve valuable resources.
Some of the functionality provided by the GUI interface of Energy Saver preference are quite powerful but limited in many ways. pmset is a command line utility to manipulate power management settings in Mac OS X. They provide greater flexibility and access to several options not available in the GUI interface.
The utility can set different power management settings depending on usage scenario. Different settings can be applied for when the machine is running from a charger, battery, UPS or all three.
To access the pmset configuration dashboard, launch the Terminal application and type man pmset 2. There are four main arguments:
- -c (charger) - adjust settings while connected to a charger.
- -b (battery) - adjust settings when running from a battery.
- -u (UPS) - adjust settings when running from a UPS.
- -a (all, default) - adjust settings for all scenarios.
Additional arguments are listed when assigning any power management settings. When invoking the command, only specified arguments modify power management options. Any arguments already set will be unmodified by pmset unless those arguments are specifically included.
pmset modifies the same file that system preference Energy Saver modifies and any changes made through pmset are saved in a persistent preferences file (per system, not per-user).
Check the Current Setup
After launching Terminal the first step is to determine which settings the Mac is currently using.
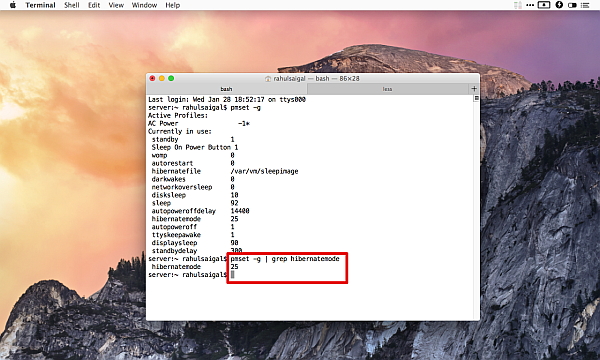
Type pmset -g and the command prints the current configuration on the Terminal screen.
If you're not sure which power management features your machine supports then type pmset -g cap, wherein cap represents the argument. One part of the column displays all the settings and other column display their corresponding values as 0 or 1.

- displaysleep - display sleep timer in minutes, 0 to disable display sleep.
- disksleep - disk spin-down timer in minutes, 0 to disable disk sleep.
- sleep - system sleep timer in minutes, 0 to disable sleep.
- womp - wake on magic Ethernet packet, 0 to disable and 1 to enable.
- autorestart - automatic restart after loss of power, 0 to disable and 1 to enable.
- powerbutton - put the machine to sleep when the power button pressed instead of shutting it down, 0 to disable and 1 to enable.
- lidwake (laptop only) - wake the machine when the laptop lid is closed, 0 to disable and 1 to enable.
- acawake (laptop only) - wake the machine when the power source is changed, such as when AC power is removed and the machine switches to battery power. 0 to disable and 1 to enable.
- ttyskeepawake - prevent the idle system sleep when any tty (such as remote login session) is active; a tty is inactive only when its idle time exceeds the system sleep timer, 0 to disable and 1 to enable.
- networkoversleep - This setting affects how OS X networking presents shared network services during system sleep. This setting is not used by all platforms; changing its value is unsupported.
- autopoweroff (AC power) - Where supported, enable per default as an implementation of Lot 6 to the European Energy-related Products Directive 3. 0 to disable and 1 to enable.
- autopoweroffdelay (AC power) - delay before entering autopoweroff mode (Value = integer, in minutes). After sleeping for autopoweroffdelay minutes, the system will write a hibernation image and go into a low power chipset sleep. Wakeups from this state will take longer than wakeups from regular sleep.
- hibernatemode - change hibernation mode. Please use caution..
- hibernatefile - change hibernation image file location. Image may only be located on the root volume of your system. Please use caution.
Safe Sleep and Standby Arguments
According to the Apple Documentation, safe sleep has three arguments:
hibernatemode=0 by default is supported on desktops. The system will not back memory up to persistent storage. The system must wake from the contents of the memory (RAM). The system will lose context on power loss. Historically, this is plain old sleep.
hibernatemode=3 by default is supported on portables or laptops. The system will store a copy of memory to persistent storage (the disk), and will power memory during sleep. The system will wake from memory, unless a power loss forces it to restore from disk image.
hibernatemode=25 is only settable via pmset. The system will store a copy of memory to persistent storage (the disk), and will remove power to memory. The system will restore from disk image. If you want hibernation—slower sleeps, slower wakes, and better battery life you should use this setting.
Apple does not recommend you to modify hibernation settings, if you choose to do so they support only these three settings as described above. Don’t use anything other than 0, 3, or 25. To determine which hibernatemode you are using, type pmset -g | grep hibernatemode.
There are two main standby arguments and they are critical for hibernation to work at the specified time interval:
standby causes kernel power management to automatically hibernate a machine after it has slept for a specified time period. This saves power while asleep. This setting defaults to ON for supported hardware. The setting standby will be visible in pmset -g if the feature is supported on the machine. Standby only works if hibernation is turned on to hibernatemode 3 or 25.
standbydelay specifies the delay, in seconds, before writing the hibernation image to disk and powering off memory for Standby.
According to the Apple support document, standby mode feature is only enabled in:
- SSD and Fusion drive of Mac mini and iMac (Late 2012 and later).
- Mac Pro (Late 2013).
- MacBook Air (Mid 2010 and later).
- MacBook Pro (Retina, 13-inch, Late 2012 and later).
- MacBook Pro (Retina, 15-inch, Early 2013 and later).
- MacBook Pro (Retina, Mid 2012).
For example, with hibernatemode in 3, the computer will sleep and not hibernate, as the default when the lid is closed, but because standby is set to ON, the computer will wait standbydelay seconds, before switching from sleep to hibernate.
This is great, as you can now close the lid of the laptop and have n seconds to go back to it, and still have a fast resume time. If you stay from computer more than the specified time period then it will go into hibernate mode.
Modifying the Settings
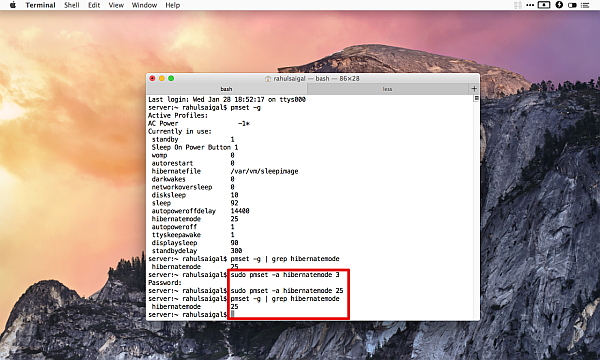
Once you see the current configuration of your computer and which mode it is presently using, make a note of it and save the file for future use. To change the sleep mode, type command sudo pmset -a hibernatemode $mode and provide the value you wish to assign. This command tells following things:
- sudo—authenticate yourself a superuser to gain extra security privileges. pmset must be run as root in order to modify any settings.
- -a - adjust settings for all three scenarios i.e, charger, battery, and UPS.
- hibernatemode - argument for changing the hibernate mode.
- $mode - provide the value you wish to assign i.e, 0, 3, or 25.
For example, we'll assume the current hibernate mode of a Mac is 3. To change it, replace $mode with 25. Press Return and you’ll be asked for your password. Provide it, and the sleep mode has been changed.
If you ever wish to go back to your previous setting, just repeat the above command and replace $mode with 3. Note that restarting is not required for these changes to take effect.
There is one more aspect of the standbydelay argument. By default the standbydelay time period is 4200 seconds, or 70 minutes. To change the time you want the computer to wait before going into hibernate, type command sudo pmset -a standbydelay value Where Value represents the time in seconds.
For example, to change the standbydelay from 4200 to 1200 seconds, type sudo pmset -a standbydelay 1200. You can change the value according to specific needs and usage.
Issues With Disk Space
hibernatefile is the pmset argument that specifies where memory contents are written to disk. By default, the RAM contents are written to /var/vm/sleepimage, and to verify this run the following command pmset -g | grep hibernatefile.
Sleepimage file is a by-product of safe sleep and it’s basically a saved state of the memory when the Mac goes to sleep. Macs use this file to save the contents before the battery completely loses its charge. When you start up the system, the Mac will restore the data from this sleepimage file. To check the size of the sleepimage file type the following command into the Terminal:
ls -lh /private/var/vm/sleepimage
You will then see data like:
-rw——T 1 root wheel 8.0G Jan 28 15:46 /private/var/vm/sleepimage
Here the 8.0G denotes the sleepimage file size, depends on the RAM and other factors.
There is a method to delete your sleepimage file, but Apple doesn’t recommend you to do this hack. Even if you delete the file, it will be recreated again next time when you put the Mac to sleep. Safe sleep is a useful feature and disabling it means that the content in RAM will not be backed up to the drive should the Mac need to hibernate.
An Alternate Application to Hibernate a Mac
You can use Terminal commands to force a Mac to use hibernation mode instead of standard sleep mode, but then you’re always stuck with hibernation mode every time you put the Mac to sleep.
With DeepSleep installed, you can use hibernation mode on demand. So now keep all the power management settings in default state, and if you think you’ll not be using computer for long period of time use DeepSleep.
To use DeepSleep, launch the app each time you want to put the Mac into hibernation mode. A pop-up notification asks if you’d like to continue, then click Hibernate. To wake the Mac, just open the lid and press the power button.
Although DeepSleep application is very useful for laptops, you can install them in desktop if you want.
 |  |