To totally unlock this section you need to Log-in
Login
The feature of AutoRecover will automatically save your working document in every specified minute, if you have enabled this feature in your Word or Excel. How to quickly access the AutoRecover file location when you need to recover the lost document in Word? This tutorial will introduce two methods to open the AutoRecover file location to recover the lost Word document, for example.
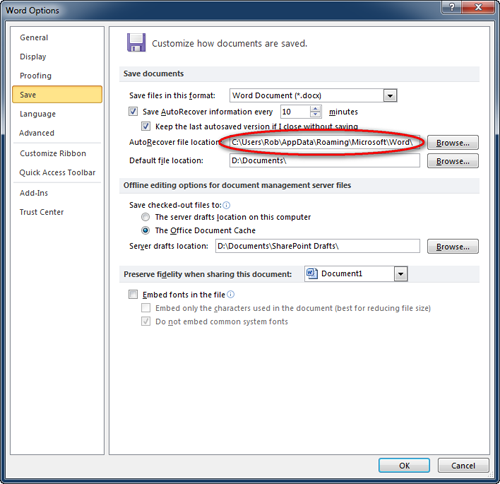
- In Word 2010 and Word 2013, click File > Options > Save.
- In Word 2007, click Office Button > Word Options > Save to see where the AutoRecover file locates in your computer.
Click File > Open in your Word 2010, and navigate to the AutoRecover file location.
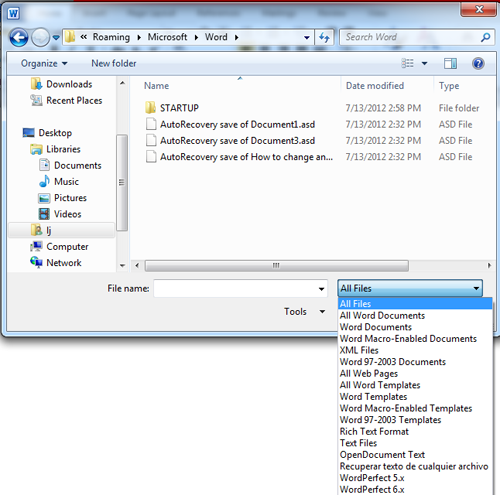
In the file type dropdown list, select All Files. At this point, you should see one (or more) files within the extension .asd: these are the lost Word documents.
Note: if the document is new and never been saved, the file name will be something like “AutoRecovery save of Document 1.asd".
If the document was already manually saved, but you lost intervening work between saves, it will have the name of the saved document (e.g, “Autocovery save of Remove indents.asd“).
In the AutoRecover file folder, select the lost word document and click Open to recover the lost word document. In some cases, the .asd file may not even have an intelligible. If no file in the directory has the expected file name, open each .asd file until you find the one that contain your missing work.
When an AutoRecover event is triggered
When an Word or Excel file is open and AutoRecover is turned on, AutoRecover does not save the file until the first change is made to the file, the AutoRecover save time interval passes, and Excel or Word has been idle for some time (the default is 30 seconds). After AutoRecover saves the file, the file is only saved at subsequent save intervals if further changes are made.
Microsoft Office Excel 2007 and Excel 2010
The controls to configure the AutoRecover feature are in the Save settings in Excel Options.
Note: to open the Save settings, click the Microsoft Office Button in Excel 2007 or the File menu in Excel 2010, click Excel Options in 2007 or Options in Excel 2010, and then click Save.
To configure the AutoRecover settings, follow these steps:
Under Save Workbooks, click to select the Save AutoRecover info every check box to turn on the AutoRecover feature.
In the minutes box, you can type any integer from 1 through 120. This box sets the number of minutes that will occur between saves: the default is 10 minutes.
In the AutoRecover file location box, you can type the path and the folder name of the location in which you want the AutoRecover files to stay.
The default location is as follows:
drive:\Documents and Settings\user_name\Application Data\Microsoft\Excel
Notes
If the location that you type is local (on your hard drive) or is on a network drive, and if this location does not exist, you receive the following error message:
Cannot access directory path.
To determine the unique number that is associated with the message that you receive, press CTRL+SHIFT+I. The following number appears in the lower-right corner of this message:
100100
If you click to clear the AutoRecover file location box but do not enter a new location, AutoRecover files will continue to be saved to the location that you cleared. This will occur until you type a new location.
The AutoRecover file location box remains empty until you type a new location.
You can turn off the AutoRecover feature in an individual workbook. To do this, click to select the Disable AutoRecover for this workbook only check box under the AutoRecover exceptions for box. Make sure that the workbook name is selected in the AutoRecover exceptions for box.
When AutoRecover files are deleted
To keep from filling up your AutoRecover location with unneeded files, AutoRecover files are automatically deleted in the following situations:
- When the file is manually saved.
- The file is saved with a new file name using Save As.
- You close the file.
- You quit Excel, whether you choose to save the file or not.
- You turn off AutoRecover for the current workbook.
- You turn off AutoRecover by clearing the Save AutoRecover info every check box.
AutoRecover save timing
The AutoRecover timer checks for changed Excel files at the interval you set in the minutes box on the Save tab in the Options dialog box. The timer starts when you start Excel.
Note: in Excel 2007, the minutes box is in the Save category in the Excel Option dialog box. In Excel 2010, the minutes box is in the Save category under File, Options.
When the first save interval passes, Excel checks to see whether any open files have been changed. If Excel locates changed files, an idle timer starts. The purpose of the idle timer is to make sure that the user does not make entries in the worksheet while the save operation occurs. The idle timer restarts each time that the user makes an entry into the worksheet so the AutoRecover save file is not created until both the save interval passes and no entries are made for the duration of the idle time.
The default idle time is 30 seconds. To change the default idle time, use the AutoRecoverDelay registry key. To do this, follow these steps:
Quit Excel if it is running, then click Start, click Run, type regedit in the Open box, and then click OK.
Locate and then select one of the following registry keys, as appropriate for the version of Excel that you are running:
For Microsoft Excel 2002:
HKEY_CURRENT_USER\Software\Microsoft\Office\10.0\Excel\Options
For Excel 2003:
HKEY_CURRENT_USER\Software\Microsoft\Office\11.0\Excel\Options
For Excel 2007:
HKEY_CURRENT_USER\Software\Microsoft\Office\12.0\Excel\Options
For Excel 2010:
HKEY_CURRENT_USER\Software\Microsoft\Office\14.0\Excel\Options
On the Edit menu, click New, and then click DWORD value.
Type the following name for the new value:
AutoRecoverDelay
Press Enter.
Right-click the AutoRecoverDelay registry key, and then click Modify. In the Value data box, type a number between 1 and 600. This is the number of seconds before AutoRecover tries to save. When you are finished, click OK.
Quit Registry Editor.
Note: only manually performed actions in the program affect the idle timer. Formulas that automatically update the file do not affect the idle timer. Excel saves the file when the idle time is reached, between the automatic updates to the formulas.
AutoRecover and multiple instances of Excel
When more than one instance of Excel is running and one instance closes unexpectedly, a new instance of Excel is automatically started and the AutoRecover files are opened. If all instances of Excel close unexpectedly, but the computer is still running, a single instance of Excel is started and all AutoRecover files are opened.
In the case of a power outage, all recovered files are opened when you start Excel again.
 |  |