To totally unlock this section you need to Log-in
Login
If you’re using a Raspberry Pi computer for your weekend project (perhaps a media centre or a home server) then there is a good chance these useful command line instructions will save you some time.
You’ve imaged your SD card and booted your Raspberry Pi. You’re probably using the Raspbian operating system and updated and configured it so that it meets your requirements. What you may not have realised is that despite the Windows-style icon-driven desktop, Raspbian is a Linux distribution. Several operating systems are available for Raspberry Pi, the vast majority of which are Linux.
Rather than an attempt to get people using Linux by stealth, the Raspberry Pi relies on these operating systems because of their open source origins and versatility.
Now, you can probably use a Linux operating system with a graphical user interface without using the command line, but this is where most of the real power lies.
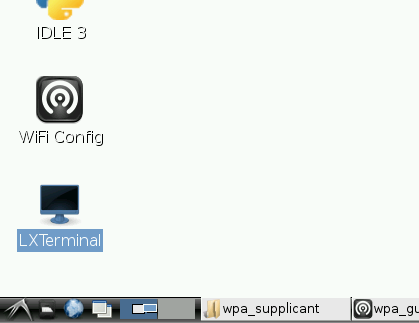
Begin by launching LX Terminal (or simply Terminal).
Raspberry Pi Command Line Basics
We wouldn't expect you to start using the command line without knowing how it works. Essentially, it is a method for instructing the computer to perform tasks. It’s really not all that different from pointing and clicking, only you’re expected to use text.

When you first access the command line, you’ll see the pi@raspberrypi $ prompt – whenever this is displayed you’ll be able to enter commands.
With a mouse-driven GUI, you can easily switch directories and read their contents. In the command line, you can check which directory you’re viewing by entering pwd (print working directory). Use ls to list the contents of the directory, and change directory by entering cd. For instance, cd edward will switch to a directory called “edward”, while cd.. will always return focus to the parent directory.
New directories are possible with mkdir newdir, where “newdir” is the directory label. You can also create a succession of new directories with mkdir –p /home/edward/newdir1/newdir2, where both newdir1 and newdir2 are created, but this will only work with the –p switch.
These are basics of all command line interfaces, and can be easily picked up. What you really need are useful commands.
Display Hardware Information
On a Windows PC or Mac you can easily find hardware information by looking in System or About This Mac. To find out about your Raspberry Pi’s hardware, enter the following:
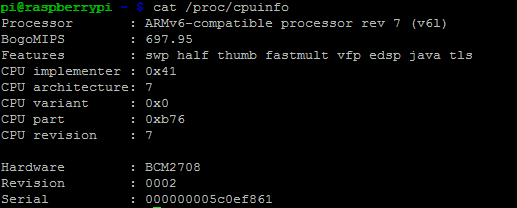
cat /proc/cpuinfo
This will output information about the device’s processor. For instance, where you see BCM2708, this indicates that the chip was manufactured by Broadcom.
Various other hardware information can be found by running commands under the proc directory.
- cat /proc/meminfo displays details about the Raspberry Pi’s memory.
- cat /proc/partitions reveals the size and number of partitions on your SD card or HDD.
- cat /proc/version shows you which version of the Pi you are using.
All of these details can be used to assess what your Raspberry Pi might be capable of. Further information can be acquired using the vcgencmd series of commands, which can reveal things like CPU temperature (vcgencmd measure_temp). This can prove vital if you’re concerned about airflow.
![]()
Other technical commands include free -o -h to see how much free system memory is available, while vcgencmd get_mem arm && vcgencmd get_mem gpu will reveal the memory split between the CPU and GPU, something that can be adjusted in the Raspbian config screen (see below).
As with the file structure, the ls command can be used to list items attached to your Raspberry Pi, specifically USB hardware. Use lsusb to display a list of attached devices – you’ll find this crucial for setting up a wireless network, mounting a hard disk drive or attaching any other USB hardware that requires some configuration.
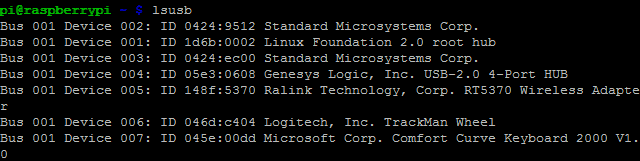
As long as the item is listed here, you should be able to set it up.
Three Important Terminal Commands
Perhaps the most important command line instruction is sudo. This single word instructs Linux-based systems such as Raspbian that the following command is to be carried out with “super user” privileges, an advanced level of access similar to (but not the same as) administrator on Windows computers.
For example, sudo apt-get install synaptic will download and install the Synaptic package manager.
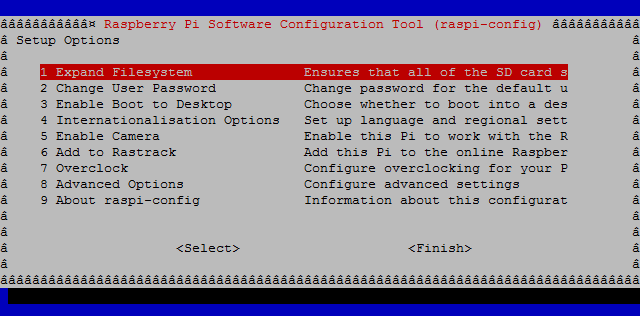
One of the most common commands for Raspbian users is sudo raspi-config. This opens the configuration screen for the operating system, which has been updated considerably since it was first released.
When you’re done in the Raspberry Pi command line, and you’re using the Raspbian (distro), enter startx to return to the graphical, mouse-driven interface.
If, on the other hand, you wish to shutdown, use sudo shutdown –h now to immediately begin the system halt and shutdown process.

You can restart with sudo shutdown –r now. A timed shutdown can be set by including a value, such as 5 minutes, or a time, such as 21:55:
sudo shutdown –h 21:55
Other useful commands
Talking of overclocking, to see the current CPU frequency along with the minimum and maximum frequencies use:
cat /sys/devices/system/cpu/cpu0/cpufreq/scaling_cur_freq
cat /sys/devices/system/cpu/cpu0/cpufreq/scaling_min_freq
cat /sys/devices/system/cpu/cpu0/cpufreq/scaling_max_freq
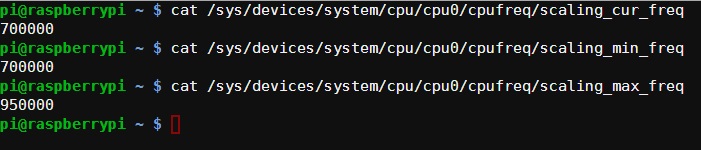
The numbers output are in kilohertz, so 950000 is 950MHz.
Other clock speeds can also be discovered using “vcgencmd measure_clock CLOCKNAME” where CLOCKNAME is one of h264, isp, v3d, uart, pwm, emmc, pixel, vec, hdmi, or dpi. For example:
vcgencmd measure_clock arm
The output is in Hertz, so 700000000 is 700MHz.
frequency(45)=700000000
You can use the following shell script to list all the clock speeds:
for src in arm core h264 isp v3d uart pwm emmc pixel vec hdmi dpi ; do \


echo -e "$src:\t$(vcgencmd measure_clock $src)" ; \


done
Another “vcgencmd” system command that you might find useful is “vcgencmd measure_volts” to find the internal voltages for core, sdram_c, sdram_i, and sdram_p. For example:
vcgencmd measure_volts core
The output will look something like this:
volt=1.20V
The following shell commands will display all the voltages:
for id in core sdram_c sdram_i sdram_p ; do \


echo -e "$id:\t$(vcgencmd measure_volts $id)" ; \


done
To see which hardware codecs have been enabled, use “vcgencmd codec_enabled CODECNAME” where CODECNAME is one of H264, MPG2, WVC1, MPG4, MJPG, or WMV9. For example:
vcgencmd codec_enabled H264
To save time repeating the command for every codec you can use this simple piece of shell script.
for codec in H264 MPG2 WVC1 MPG4 MJPG WMV9 ; do \


echo -e "$codec:\t$(vcgencmd codec_enabled $codec)" ; \


done
As we have seen before we can see how the memory is split between the CPU and the GPU use:

Finally, to see how much free memory is available to the system use:
free -o -h
If you have any questions about vcgencmd or any of the other system tools mentioned, please leave a comment below and we will see if we can help.
 |  |
Raspberry Pi is an amazing platform to create or develop hardware/software solutions or integrate some technologies.
However, it could be a bit confusing, specially for those not comfortable with Linux systems. Read more on HeelpBook on how to see some useful information of a Raspberry Pi device and to begin trying some commands:
Useful Commands on Raspberry Pi – http://heelpbook.altervista.org/2015/useful-commands-on-raspberry-pi/ #raspberry #howto #heelpbook #commands #linux