To totally unlock this section you need to Log-in
Login
Note: The image editing capabilities in PowerPoint are very basic. You can use it to resize, crop, and group images, but on a very simple level (see below). Another program such as Microsoft Photo Editor or Adobe Photoshop is recommended for more advanced image editing.
To format an image in PowerPoint, you can use either the Format tab or the Format Picture dialog box.
Format Picture Tab & Menu
After you insert an image the Picture Tools - Format tab will automatically appear. It will disappear if you click outside of an image. To reactivate the tab, just click on the picture you wish to edit. PowerPoint will show a preview of all formatting changes as you roll your mouse over them.
You can also use the Format Picture menu to make many of the adjustments described below. To access this menu, press the arrow button Menu Arrow on the bottom right of any of the groups on the Picture Tools tab.
Adjust Picture Settings
The Adjust group on the Picture Tools tab allows you to adjust the brightness and contrast of your image. You can also use the recoloring options to change the tint of your picture.
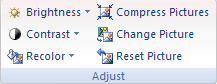
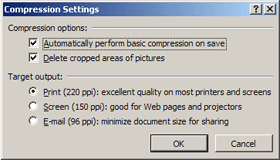
Compression Settings - If you find that your PowerPoint presentation is loading slowly, the Compress Pictures option may help it run faster. A dialog box will appear that gives you the choice of compressing all the images in your presentation or only the ones currently selected. Under Options on this dialog, you can also choose to compress your images based on how you intend to deliver your presentation - through print, on the web or a projector, or through email.
If you would like to replace your picture, an easy way to do this is to use the Change Picture option. By using Change Picture, your replacement image will retain the same size and position settings as the original. Changes to the brightness, contrast, and color of the picture will not carry over, but any border, style, and arrangement settings will be applied.
If after making adjustments to your image you find that you would like to start over, use the Reset Picture option. Note: This will reset the size of your image as well!
Borders and Effects

With the Picture Styles group you can add some interesting effects to your images, including regular borders and shaped borders, shadows and reflections, and 3-D rotation options. PowerPoint comes with a number of built-in options, or you can customize your own using the drop down Picture Shape, Picture Border, and Picture Effects menus on the right.
Arranging, Aligning & Grouping Images

Picture Tools - PowerPoint allows you to overlap objects, so that for example you could have a text box or a callout over an image, or two images that overlap each other, or several solid shapes and lines arranged to make an interesting background on a slide master.
To determine the order of images or objects you have several options:
To put the image on top of or behind all other objects, select the image and then click on Bring to Front or Send to Back. If you have more than two objects to arrange, use the menu arrows beside the Bring to Front or Send to Back buttons to bring the image forward or backwards by one.
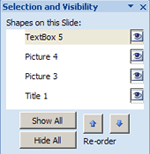
If you have a lot of objects click on Selection Pane to bring up a list of all the elements on your slide. Using the options on the pane you can re-order the objects, hide individual items, and show or hide everything.
Arranging
You can always move objects by clicking and dragging them, but if you want to be more exact with your placement, use the options under the Align menu. You can use this to place objects to the right, left, top, bottom, and center of the slide, make sure the object is both horizontally or vertically centered by using the distribute options, or display a grid to help with your manual placements.

PowerPoint also has the ability to rotate a picture. Click on Rotate to rotate the picture 90° right or left, or to flip the image vertically or horizontally. If you would like to specify another angle for your image, choose More Rotation Options under the Rotate menu to bring up the Size and Position dialog.
In the example to the left, our image is rotated by -18° (click for a full-size view). You can also use the Size and Position dialog to alter other aspects of your image, such as the scale and its position on the slide.
Grouping
The final option in the Arrange section is the Group button. This button is used to combine objects into one so that they can be moved and edited all at once. Note: This button will remain inactive unless you have multiple objects selected. To select and group multiple objects:
- Click on the first object
- Hold down the Shift or Ctrl button on your keyboard while clicking on any other items you wish to group together
- Click the Group button
- If you wish to ungroup the objects, select the combined object, click on the Group button and choose Ungroup.
Cropping & Resizing Images
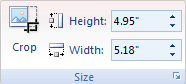
The last group in the Picture Tools tab is the Size group. Here you can specify the height and the width of the selected image.
You can also use the Crop tool to remove unnecessary parts of your images. Cropping resizes an image by hiding horizontal or vertical edges.
To crop an image, click the Crop button. Special handles will appear around your image, as seen below.
Click and drag the handles inward to hide that part of your image. You can also use out-cropping to add a margin to an image. Simply drag the handles away from the image rather than inward. If you want to undo a crop, you can either click Crop again and drag the handles outward to make the hidden part visible or simply click the Reset Image button.
 |  |