To totally unlock this section you need to Log-in
Login
Conditional formatting is a way to make the incoming messages that meet defined conditions stand out in the message list by using color, fonts, and styles. You specify conditions that an incoming message should meet, such as a sender’s name or email address, and then conditional formatting is applied only to those messages.
For example, a conditional rule can specify that all messages sent from your manager appear in red text in the message list. If you want to make further changes to the body of your email messages, change the default font or text color for email messages.
NOTE: Beginning with Microsoft Outlook 2010, the Organize feature that enabled you to create conditional text formatting rules for email messages was removed. Conditional text formatting is now accessed in the Advanced View Settings dialog box.
Create a conditional formatting rule
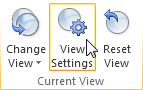
In Mail, click View. In the Current View group, click View Settings.
In the Advanced View Settings dialog box, click Conditional Formatting.
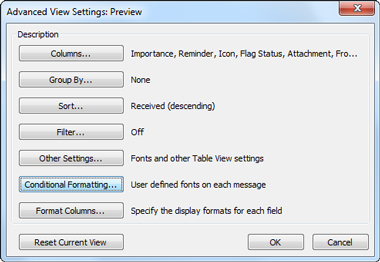
A set of default rules appears. This includes the Unread messages rule. This rule makes unread messages appear bold in the message list. In addition, any conditional formatting rules that you created in the Organize pane with an earlier version of Outlook appear.
Do any of the following:
- To delete a rule, click the rule, and then click Delete.
- To temporarily turn off a rule, clear the check box for that rule.
- To change the criteria for a rule, click the rule, and then click Condition.
- To change the text formatting, click the rule, and then click Font.
- To add a new conditional formatting rule, click Add, in the Name box, type a name, click Font to specify the formatting, and then click Condition to specify the criteria for this rule.
Example conditional formatting rules
These are some examples of conditional formatting rules that you can create in Outlook 2013.
Make all messages from John Kane appear in red:
- Click Add.
- Enter a name for the rule.
- Click Font.
- Under Color, click Red.
- Click OK.
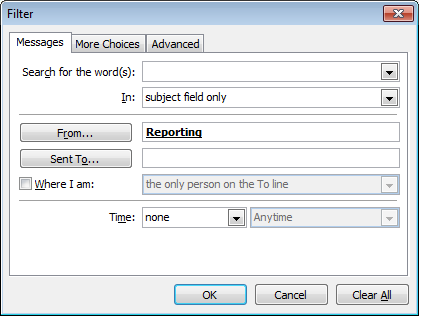
- Click Condition.
- In the From box, type John Kane.
NOTE: the name must exactly match the full name that appears on messages that you receive.
- In the Filter, Conditional Formatting, and Advanced View Settings dialog boxes, click OK.
- Make all messages that contain the word Contoso in the subject appear green
- Click Add.
- Enter a name for the rule.
- Click Font.
- Under Color, click Green.
- Click OK.
- Click Condition.
- In the Search for the word(s) box, type Contoso.
- In the Filter, Conditional Formatting, and Advanced View Settings dialog boxes, click OK.
Make all messages that contain the word holiday in the subject or message body appear blue:
- Click Add.
- Enter a name for the rule.
- Click Font.
- Under Color, click Blue.
- Click OK.
- Click Condition.
- In the Search for the word(s) box, type holiday.
- In the Filter, Conditional Formatting, and Advanced View Settings dialog boxes, click OK.
 |  |