To totally unlock this section you need to Log-in
Login
VLC, common known even as VideoLAN, is a powerful utility to see or listen video and audio files, but not so many users know that VLC is even a powerful streaming server, able to stream our audio and video files on mobile devices.
VLC is a free and open source cross-platform Multimedia Player, Media Converter and Streamer. VLC includes a fairly easy-to-use streaming feature that can stream music and videos over a local network or the Internet. You can tune into the stream using VLC or other media players.
Web Interface
Use VLC’s web interface as a remote control to control the stream from elsewhere. Bear in mind that you may not have the bandwidth to stream high-definition videos over the Internet, though.
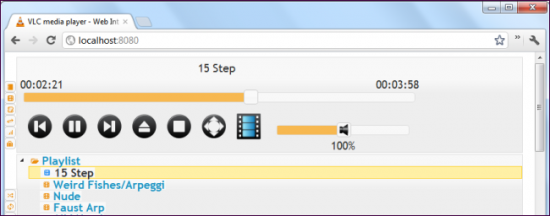
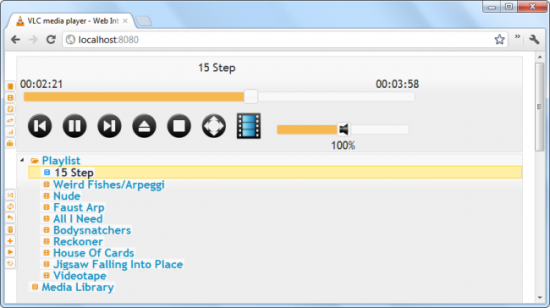
VLC includes a web interface, which you can enable to access your VLC player from a web browser, controlling playback from another device – particularly useful for a media center PC. VLC also offers a mobile web interface for smartphones.
The web interface is turned off and locked down by default – you have to edit the web server’s .hosts file or VLC will disallow all incoming connections from other devices.
Activating the Web Interface
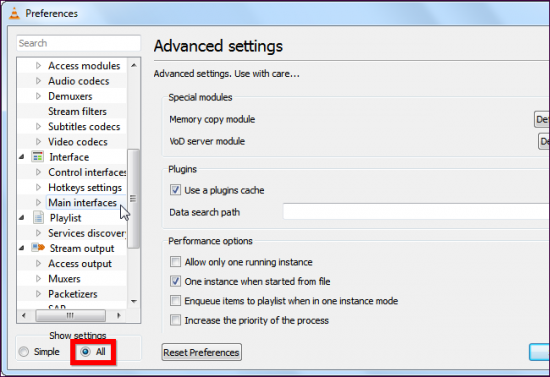
To activate the web interface, click the Tools menu in VLC and select Preferences.

Click the All option under Show settings to view VLC’s advanced settings. Scroll down in the list of advanced settings and select Main interfaces under the Interface header.
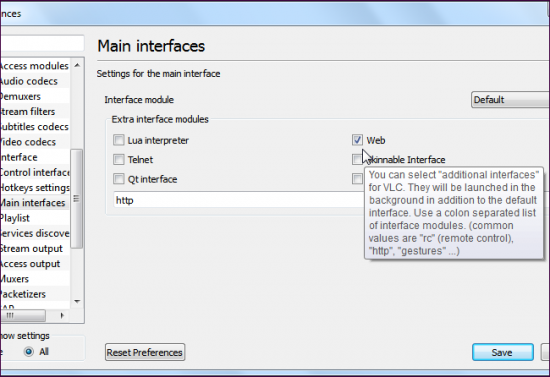
Click the Web check box to enable the HTTP interface.
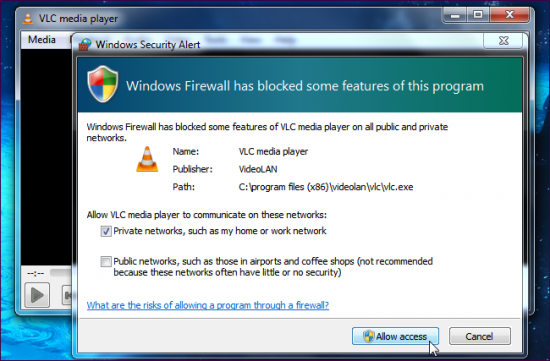
Save your settings and restart VLC. Each time you start VLC, the web server will be started in the background – Windows will prompt you, typically on Windows Vista or Windows 7, to allow VLC firewall access when you restart it, indicating that the web server is running.
However, after you've enabled the Web interface within VLC you couldn't access it yet. To ensure you can access it you can use the following batch DOS command:

NOTE: you can specify the HTTP port (using the --http-port with this command, and even the IP address to bind the web server.
After you have enabled the web interface and then ran VLC with the above command in Command Prompt, click the following link or plug its address into your browser to access the VLC web interface on your local computer:
http://localhost:8080/


or


http://127.0.0.1:8080/
If you’re using VLC 2.0.1, certain elements of the web interface – the seek bar in particular — may not work properly. This is a bug in version 2.0.1 that isn’t present in 2.0.0 and has been fixed for version 2.0.2. VLC 2.0.0 includes a new web interface that replaces the old one.
Allowing Remote Access
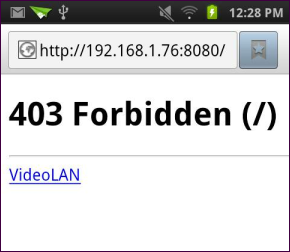
By default, the web interface is completely locked down – it’s restricted to localhost, which means you can only access it from the machine VLC is running on. You’ll see a 403 Forbidden error page if you try to access VLC’s HTTP server from any other device.
To allow access from other computers, you’ll have to edit the web interface’s .hosts file. You’ll find this file in different directories on different operating systems:
- Windows – C:\Program Files (x86)\VideoLAN\VLC\lua\http (use “Program Files” instead of “Program Files (x86)” on 32-bit versions of Windows).
- Mac OS X – /Applications/VLC.app/Contents/MacOS/share/lua/http/.hosts
- Linux – /usr/share/vlc/lua/http/.hosts
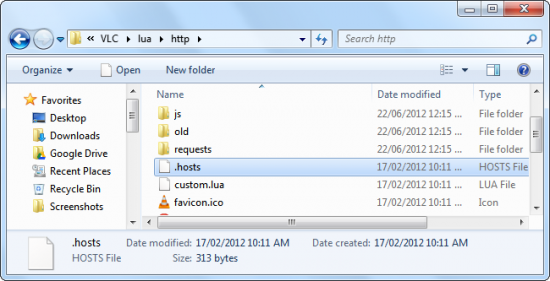
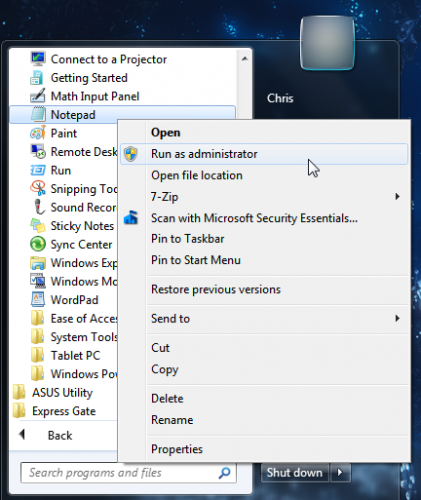
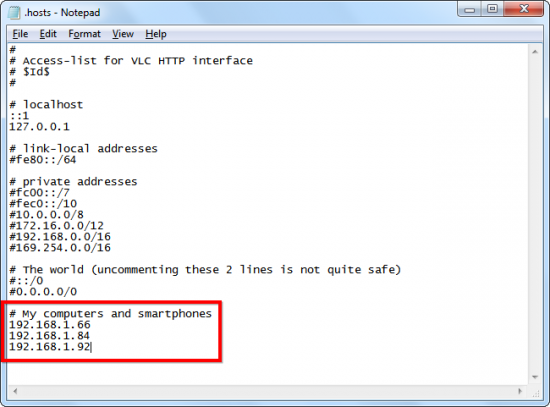
To edit this file on Windows, you’ll have to open Notepad – or another text editor – as Administrator. Browse to the folder mentioned above and select “All Files” in Notepad’s open dialog to view the .hosts file.
You can uncomment the last two lines (to uncomment a line, remove the # at the beginning of the line) to allow access from all IP addresses, but the file notes this isn’t completely safe. You could also allow a range of IP addresses – or specify the IP address of each other device you want to allow here (add each IP address on a separate line).
Save the file and restart VLC after making the change.
Using the Web Interface
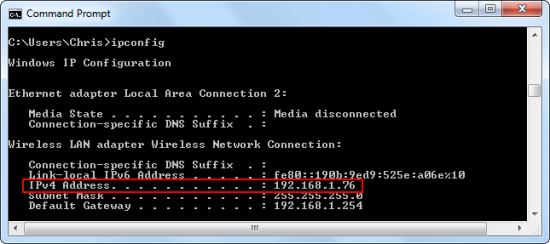
Plug http://123.456.7.89:8080 into a web browser on an allowed computer or smartphone to view VLC’s web interface. Replace the “123.456.7.89” in the address with the IP address of the computer running VLC.
If you need to find your computer’s IP address, you can use the ipconfig command in a Command Prompt window. Look for the IPv4 Address row under the name of your connection.
If you also want to access VLC’s web interface over the Internet instead of your local network, you’ll have to forward ports on your router.
Broadcasting a Stream
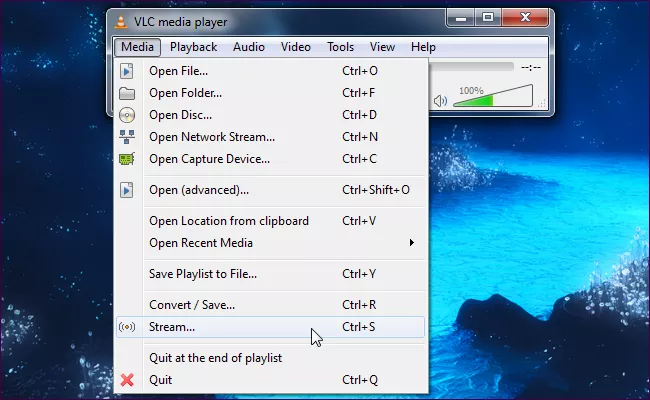
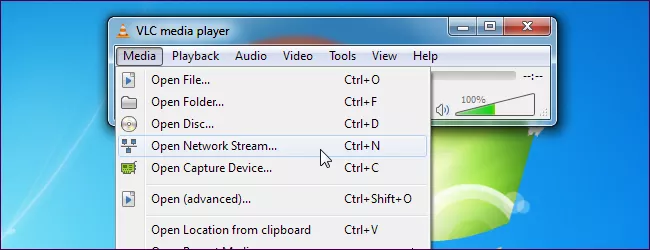
To start broadcasting a network stream, click the Media menu in VLC and select Stream.
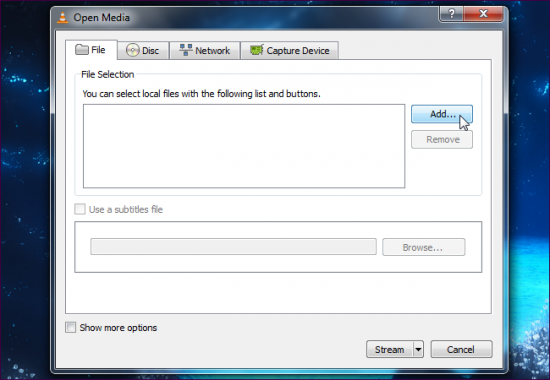
In the Open Media dialog, select the media you want to stream. You can select one or more files on the Files tab, select a CD or DVD on the Disc tab, or even capture video from a specific device on the Capture Device tab. For example, you could stream your desktop by selecting Desktop on the Capture Device tab.
Click the Stream button after selecting your media.
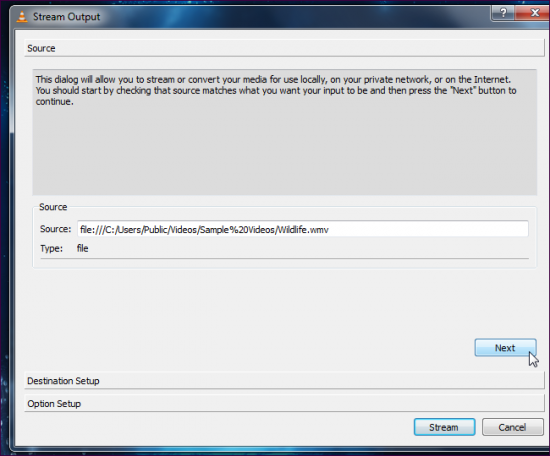
The Stream Output window will appear. The first pane just lists the media source you selected – click Next to continue.
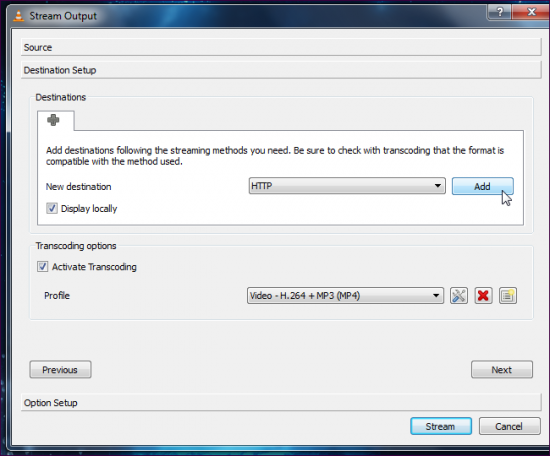
On the Destination Setup pane, you’ll need to choose a destination for your stream. For example, you can select HTTP to listen for connections – other computers can connect to your computer and watch the stream. You can also select UDP to broadcast to a specific IP address or range of IP addresses.
After selecting your destination, click the Add button. You may also want to activate the Display locally check box – if you do, you’ll see and hear the media being streamed on your local computer, so you’ll know it’s playing correctly.
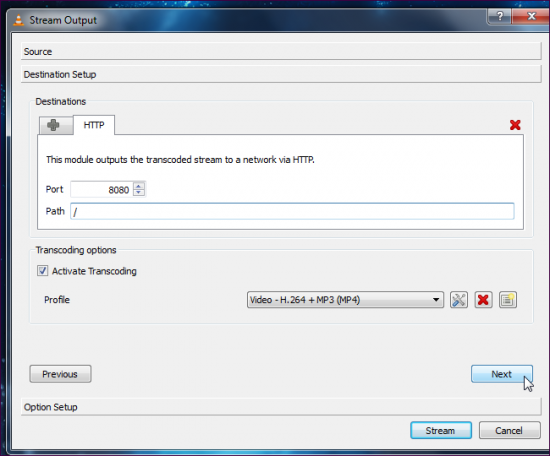
After adding a destination, you’ll be able to customize its settings. With the HTTP destination, you could specify a custom path – but the default one will work fine.
You can also tweak the transcoding settings – by transcoding to a lower quality, VLC can save network bandwidth.
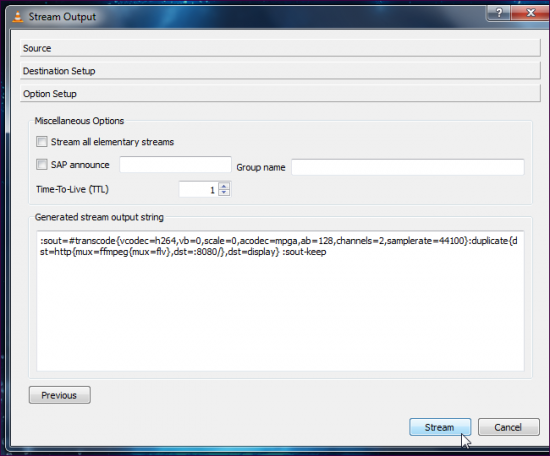
Click Next to continue to the Option Setup pane – you probably don’t need to tweak any of the advanced options here. To start streaming, click the Stream button.
If you selected the Display locally option, the media will start playing locally on your computer.
If you have a firewall enabled, ensure that VLC is an allowed program or no computers will be able to connect. If you’re trying to stream over the Internet, you may also need to forward ports on your router.
Connecting to a Stream
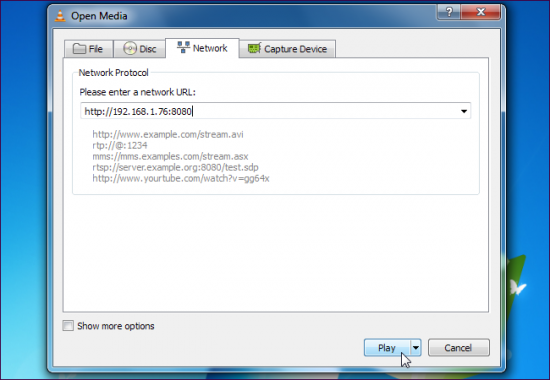
To tune in to a stream, click the Media menu in VLC on another computer and select Open Network Stream.
Assuming you used HTTP, enter an address like http://IP.Address:8080. To find your server IP address you can use the ipconfig (or ifconfig on Linux) command in Command Prompt (or Terminal on Linux).
(If you specified a custom path for your HTTP stream in the Path box, you’ll need to specify the custom path here. For example, if you specified /path as your custom path, you’d enter http://IP.Address:8080/path in the box here).
After clicking Play, the stream should start playing. To control playback remotely, try setting up VLC’s web interface. If you encounter an error, make sure VLC isn’t being blocked by a firewall on the streaming system/server.
![]()
How to associate RTSP protocol with VLC on Windows 7/8
Make a rtsp.reg (you can obviously use any name for this file, it's important only the file extension .reg) file and add the following:
Windows Registry Editor Version 5.00


[HKEY_CLASSES_ROOT\rtsp]


@="Real Time Streaming Protocol"


"URL Protocol"=""


[HKEY_CLASSES_ROOT\rtsp\shell]


[HKEY_CLASSES_ROOT\rtsp\shell\open]


[HKEY_CLASSES_ROOT\rtsp\shell\open\command]


@="\"C:\\Program Files\\VideoLan\\VLC\\vlc.exe\"%1"


[HKEY_CLASSES_ROOT\rtp]


@="Real Time Transport Protocol"


"URL Protocol"=""


[HKEY_CLASSES_ROOT\rtp\shell]


[HKEY_CLASSES_ROOT\rtp\shell\open]


[HKEY_CLASSES_ROOT\rtp\shell\open\command]


@="\"C:\\Program Files\\VideoLan\\VLC\\vlc.exe\"%1"
Double click the .reg file and add, and confirm, to registry.
Enable the VOD feature with VideoLAN
VLC has a mode that allows it to work as a VOD server. This mode is called “VLM” (VideoLAN Media) and is controlled through the telnet interface. A VOD server uses the RTSP protocol (RFC 2326) to control the clients request. The default RTSP server port is 554.
With Video On Demand (VOD), the user can start the video when he wants, make pauses, go forward and back in the video. It is of course the best in video streaming and the dream for every user.
VOD is a very big consumer of resources for the server and the network. VOD is unicast, not multicast: this means that the network and server resources needed are directly proportional to the number of clients.
The design of VideoLAN's VOD solution is very simple. The idea is to do HTTP streaming, i.e. stream an MPEG video encapsulated in HTTP. The regulation of the bitrate between the client and the server is done automatically by TCP. With HTTP version 1.1, there is the possibility to seek in a file downloaded, that's what we use to seek in the video.
To implement a VOD simple infrastructure we need some software stuff:
- VideoLAN (VLC) 2.08 (actually the 2.1.x versions doesn't work);
- VLC's telnet interface enabled and tested with a terminal/telnet emulator like PuTTY;
- A video file (.avi, .mpg, etc.);
NOTE: we'll provide a copy of VLC 2.0.8 on HeelpBook too, you'll can download it from the bottom of this article.
To enable the telnet interface of VLC we can operate with both command line or GUI. To enable telnet interface (we need that interface to enable and setup a VOD stream) via GUI we'll have to go to Tools --> Preferences and then, after we've enabled All advanced settings, go on Main interfaces:
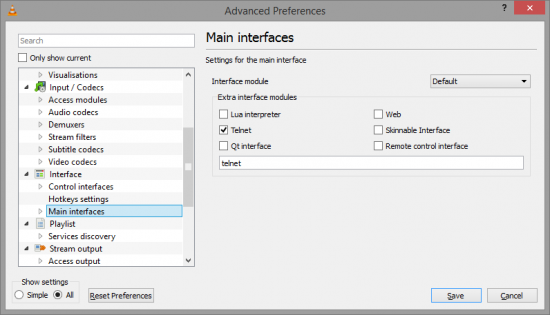
After checking the Telnet interface VLC will start the background telnet routine, and we will be able to connect to his telnet session by using the following options in PuTTY:

However, using the GUI option will force us to start the whole VLC's GUI (we'll be force to keep VLC running on server and if we'll close it the streaming server will cease with it): this will no happen if we'll use the command line's approach.
To enable the telnet interface via Command Prompt we will need to change our working directory and enable the telnet daemon. Usually, on Windows 7/8 64-bit we'll run the following command:
vlc --ttl 12 -vvv --color -I telnet --telnet-password=videolan --rtsp-host=0.0.0.0:554
Basically this command will enable and run the telnet feature of VLC, it'll set the telnet password we'll need soon and it'll setup the RTSP (Real Time Streaming Protocol) host VLV will use to stream our media.
Summarizing:
- 12 is the value of the TTL (Time To Live) of your IP packets (which means that the stream will be able to cross 11 routers).
- telnet launches the telnet interface of the vlc.
- videolan is the password to connect to the telnet interface.
- 0.0.0.0 is the host address (in this case is equivalent to 127.0.0.1 or localhost).
- 554 is the port on which you stream.
First we need to telnet into VLC (using logic port 4212, the password we've defined with the command line and using PuTTY). Now we need to create a VOD object inside VLC process and the we'll specify what is the media, movie for example, we want to stream. For now we'll connect to the VLC telnet interface and create the vod object:
new Test vod enabled
After this we'll have to specify, ever in the same telnet session, the input media to stream to other clients, in VOD mode:
setup Test input "C:\users\unknown\videos\my_video.mpg"
You can access to the stream with (from command prompt, in C:\Program Files (x86)\VideoLAN\VLC):
vlc rtsp://server:554/Test
Where server is the address of the streaming server (IP or DNS). Note that Test is how we have named the VOD object previously during the telnet session.
You can even omit the server part of the rtsp url, like the following:
vlc rtsp://:554/Test
No Stream available or couldn't connect to stream
If we're testing VOD on our local machine, after this setup, we could have some issue opening the stream, even if we have set up all in the correct way. The error could appear like the following:
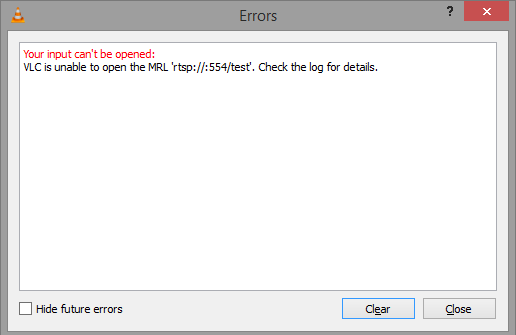
To fix this behaviour we've to add a directive to the VOD object definition. We have to setup a mux with the VOD object to let the client know how to play properly the stream. We can define the mux using the new directive or using the setup directive (always during a telnet session in VLC).
Here's the good method to stream an avarage .avi movie using VOD object:
new Test vod mux mp2t enabled
And after that we can setup our new VOD object using the same setup directive we've used previously.
NOTE: every VOD object will be alive until the VLC's process is running in background. If we'll kill the vlc.exe process using, for example, Task Manager, we'll lost the configuration used for any VOD object: they'll be deleted. We can avoid this extreme case of failure by using VLM configuration files and a simple command to restart VLC in "VOD mode" pipening the VLM configuration file that contains all our precious VOD object, well-defined.
VLM Configuration Files
A VLM configuration file is a list of command lines: one line corresponds to one command line. To create a configuration file, just create/edit a text file and type a list of VLM commands.
Beware of recursive calls: you can put a load (file) in a configuration file which can lead to recursive inclusion of the same file and result in VLC's crash.
You can automatically load a VLM configuration when launching VLC with the --vlm-conf
vlc -I telnet --vlm-conf vlm.conf
A single VLM configuration file (a simple text .txt file) with a single VOD object defined will be like the following:
NOTE: you can also specify options, a muxer, or an additional output chain that will be prepended to the RTSP output used by VOD (e.g. to enable transcoding). Make sure to enter the corresponding commands before the VOD media is enabled, or before you setup the input.
new Test2 vod


setup Test2 output #transcode{vcodec=h264,vb=512,acodec=mp4a,ab=96}


setup Test2 mux mp2t


setup Test2 input "file://C:\videos\my_video.mpg"


setup Test2 enabled
In this example we can see that the transcode directive contains some options like VCODEC, the video codec that will be used, VB, the relative video bitrate, ACODEC, the audio codec that will be used, and AB, the relative audio bitrate. Obviously we can decide to transcode only the video or the audio and leave the outher track, video or audio, unchanged.
Following some video and audio codecs usable in vcodec and acodec properties:
Streaming MP3s
To stream our loved-mp3s we'll have to mux them and transcode them using the same VOD method (always from using the VLC's telnet session):
new testmp3 vod mux ts enabled


setup testmp3 input "C:\Users\Unknownable\Music\ourbelovedmp3.mp3" output "#transcode{acodec=mp3,ab=320,channels=2}"
Video Codecs
Use the "code", like mpv4 or h264, part in your vcodec= commands:
mp1v - MPEG-1 Video - recommended for portability
mp2v - MPEG-2 Video - used in DVDs
mp4v - MPEG-4 Video
SVQ1 - Sorenson Video v1
SVQ3 - Sorenson Video v3
DVDv - VOB Video - used in DVDs
WMV1 - Windows Media Video v1
WMV2 - Windows Media Video v2
WMV3 - Windows Media Video v3, also called Windows Media 9 (unsupported)
DVSD - Digital Video
MJPG - MJPEG
H263 - H263
h264 - H264
theo - Theora
IV20 - Indeo Video
IV40 - Indeo Video version 4 or later (unsupported)
RV10 - Real Media Video
cvid - Cinepak
VP31 - On2 VP
FLV1 - Flash Video
CYUV - Creative YUV
HFYU - Huffman YUV
MSVC - Microsoft Video v1
MRLE - Microsoft RLE Video
AASC - Autodesc RLE Video
FLIC - FLIC video
QPEG - QPEG Video
VP8 - VP8 Video
Audio Codecs
Use the "code", like mp3 or mpga, part in your acodec= commands:
mpga - MPEG audio (recommended for portability)
mp3 - MPEG Layer 3 audio
mp4a - MP4 audio
a52 - Dolby Digital (A52 or AC3)
vorb - Vorbis
spx - Speex
flac /fl32 - FLAC
Create an HTML page/interface to access your RTPS streams
We can access our RTPS streams, for example in a VOD network, using the built-in web server of VLC by creating a simple HTML page on the server side (our streaming system) and by associating RTPS protocol handler to VLC player on the client side.
To add your custom HTML pages or PHP applications we'll have to move them in the following path:
C:\Program Files (x86)\VideoLAN\VLC\lua\http


or


C:\Program Files\VideoLAN\VLC\lua\http
A very simple HTML page that contain a single RTSP VOD link is in the following code:
<!DOCTYPE html PUBLIC "-//W3C//DTD XHTML 1.0 Strict//EN" "http://www.w3.org/TR/xhtml1/DTD/xhtml1-strict.dtd">
<html xmlns="http://www.w3.org/1999/xhtml">


<head>


  <title>VLC media player - Web Interface - VLM


  <meta http-equiv="Content-Type" content="text/html; charset=utf-8" />


</head>


<body>


<center><a href="rtsp://192.168.100.56:554/Test">Test Streaming LINK</a>


</body>


</html>
Obviously in this way, after we've created and tested VOD objects we'll just to add a new link in this simple HTML page and then open it from any system in the same LAN (Local Area Network). If you'll want to access this streams from internet you'll have to open the 554 logical port and then forward your internet traffic, for the RTSP streams, from your router to your local streaming server, and you'll have to know your external/public IP address.
Download
To download the attachments of this article you'll need to be registered and logged on. Sorry for the inconveniencce.
[wpfilebase tag="file" id=150 /]
[wpfilebase tag="file" id=151 /]
 |  |
Do you need to stream your media across a network, and you want to stream them only on demand….through a simple HTML page? You could obviously using VLC media player (VideoLAN), by using the “hidden” VOD objects and the his telnet feature.
Streaming guide with VLC VideoLAN – http://heelpbook.altervista.org/2014/streaming-guide-with-vlc-videolan/ – #howto #vlc #videolan #heelpbook #streaming #media @Heelpbook