To totally unlock this section you need to Log-in
Login
The Auto-Lock feature, present on most Windows operating systems, provides an additional security option that restricts access to other users when you're not present. However, if privacy is not a concern for any of your workstations, then disabling this option might be a good idea if you wish to have uninterrupted access to a given computer. Disabling this built-in feature can be accomplished by making a quick configuration change through the Windows Registry Editor. Be careful when making changes through this utility since an erroneous change could lead to serious functionality problems on your system.
Auto Lock
As everybody knows, using the Windows+L keys together will lock your workstation running Windows 7, XP or Vista. Did you realize that you can also disable this function by using a registry hack?
I suspect that this article will be much more useful to those of you who can’t lock your workstation, but either way we’ll show how to configure this setting.
Manual Registry Hack
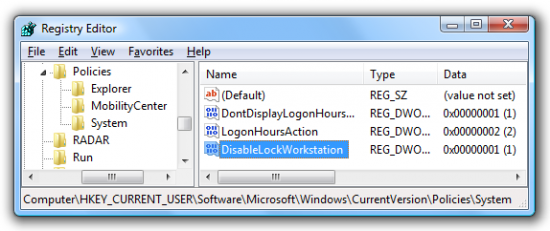
Open up regedit.exe through the start menu search box, and then browse down to the following key, creating it if it doesn’t exist:
HKEY_CURRENT_USER\Software\Microsoft\Windows\CurrentVersion\Policies\System
On the right-hand side, create a new DWORD 32-bit value named DisableLockWorkstation and give it one of these values:
1 – Disable Lock Workstation
0 – Enable Lock Workstation
The changes should be immediate, no need to restart anything.
Download Registry File
We’ve provided the hack in a downloadable registry file. Just unzip and then click on the Enable or Disable script, depending on which action you feel like taking.
NOTE: register or log-in to download this registry hack.
[wpfilebase tag="file" id=128 /]


