Start VisualWget and setup your options
In VisualWget, you first create a download definition that has all the information needed to download the files you want from a website. Those definitions are saved by the program (unless you remove them), so they can be reused if the website has changed and you want to update your downloaded files to match.
To create a new download definition, select the New... item in the Downloads menu (this is in the normal location of the File menu). You will be given the option of simply typing the URL of a single web page to download, or defining a set of options for your [gs download].
In order to download an entire website, you need to define options, so select that.
Warning: while you are setting options in the New Download window, do not click the "OK" button. That button immediately starts the downloading process. Only click that button after all options have been set.
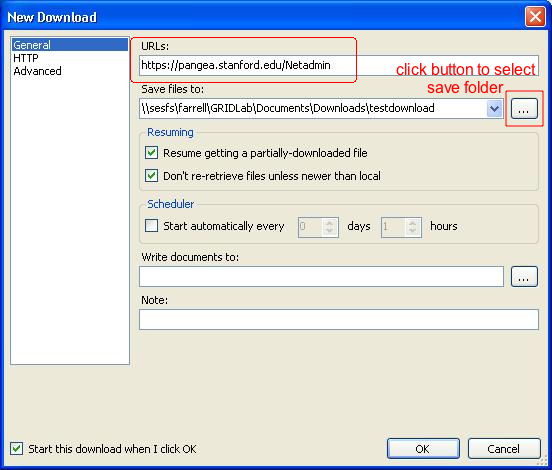
The New Download window will open, starting at the General options, as shown in the annotated [gs screenshot] below:
Simply type (or cut and paste) the URL of the website you want to [gs download] in the "URLs" field (outlined in the red box). Next, tell the program where to setup the [gs directory] structure and saved files from this website. Click on the button to the right of the "Save files to:" field (outlined in red with annotated instructions) to bring up the standard Windows open dialog box. Navigate to the folder of your choice and select it. The two options under "Resuming" are normally checked and should be left alone.
Now you need to select some other options that are necessary or useful for downloading an entire website. I will only describe the minimum set of selections you need for downloading a well-behaved website. If you have problems getting the download to work, you should look at the other options. Clicking an option name (not the checkbox next to it) will give a one-line explanation. Since VisualWget is just a front-end to the Wget program, and uses the same option names, you can get detailed descriptions of what these options do from the official Wget on-line manual.
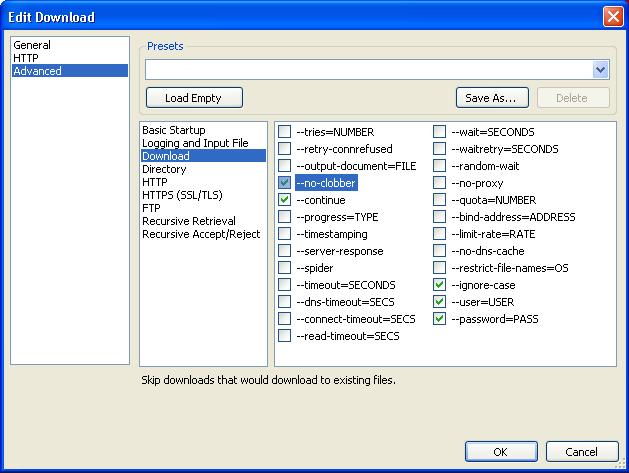
Click on the Advanced field on the left side of this New Download window. This gives you a whole series of sub-sections, each of which has a series of options you can select by clicking on checkboxes. The first sub-section you need to configure is Download. Here are my recommended options for the Download subsection, as shown in the screenshot below.
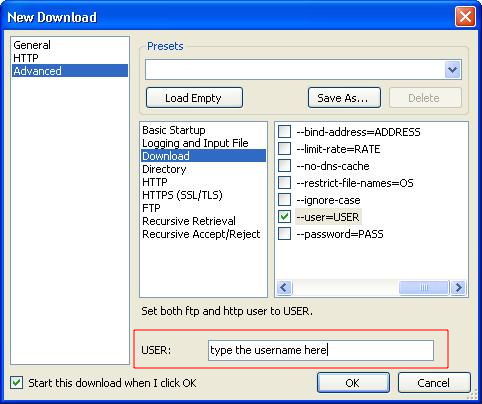
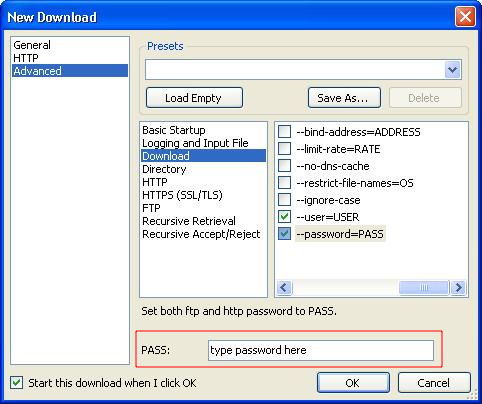
If you checked the --user=USER and --password=PASS options in the Download subsection (above), you have another step: you have to enter the username and password for the website. You do this by clicking on the option name itself (for example, clicking on the text --user=USER), not on the checkbox. That opens a new field in the lower part of the window where you can type the value needed.
For example, in the annotated screenshot below, I have clicked on the --user=USER text, and that gives me a USER: field where I can type the username needed to login to the site. The second screenshot shows the same thing for the --password=PASS option.
Now, you have to set the options that tell Wget to get the entire contents of the website, not just the one page in the URL you specified.
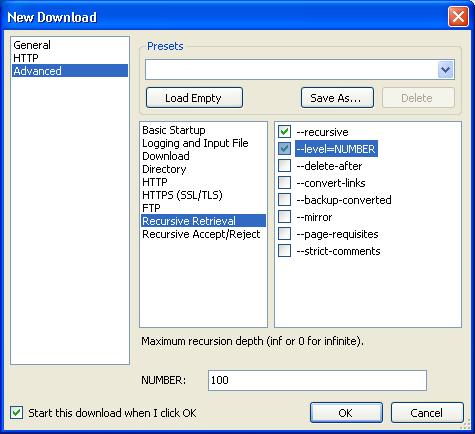
Click on the Recursive Retrieval subsection heading of the Advanced options. Here you have to check the box next to two key options, as shown in the screenshot below.
This tells the program to follow links from the first URL, and then links from those links, etc, until it has downloaded the entire website. It will not follow links that go to other domains (off this website).
Although the program allows "infinite" recursion, this is not a good idea. A poorly programmed website, especially one with dynamic content, may result in links that point back to other levels, with perhaps very slight changes, resulting in another round of downloads, ad infinitum. It's best to put in a large, but finite, number that should be comfortably larger than the number of levels you expect.
For example, in the screenshot below, I use "100" as the number of levels. As for the username and [gs password] options, you click on the text of the option name itself (--level=NUMBER) in order to bring up the "NUMBER" field where you can enter the maximum number of levels for the recursive downloads.
It is also a good idea to do a test run of your website download with this level parameter set to "2". That will verify that it does follow links, but minimize the number of files downloaded for the test.
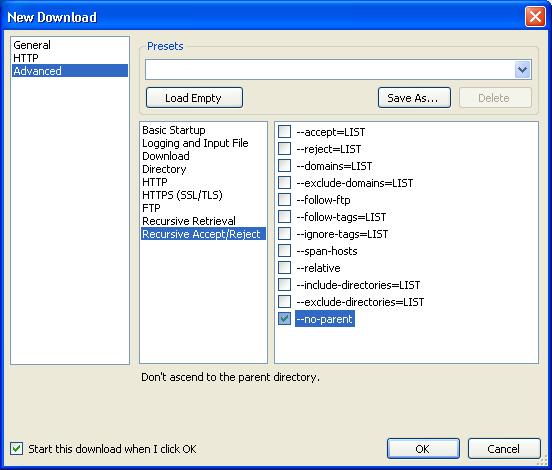
There is one more option you should set to make sure your download does not get extra files that you don't want. Click on the Recursive Accept/Reject subsection heading of the Advanced options. As shown in the screenshot below, click the box next to the --no-parent option.
This option tells the program not to follow links that go back up to a higher level of the website. For example, if you are downloading http://pangea.stanford.edu/Netadmin/, this option will prevent the program from following links that go back up to the parent site at http://pangea.stanford.edu/
Run your download job
Following the instructions above, you have configured the options for a website download job in VisualWget. Now simply click on the OK button in this New Download window to start the downloading process.
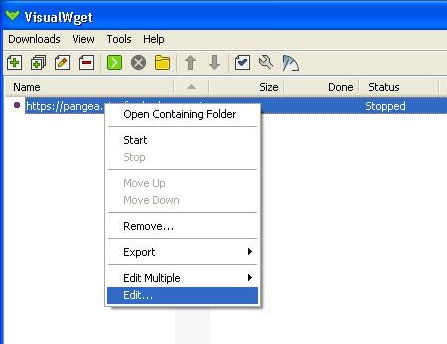
VisualWget saves your download job definitions. You can re-run the job later, perhaps with modified options. To edit the definitions before re-running, you can right-click on the definition name in the main VisualWget window, and then select the Edit item, as shown in this screenshot:
SOURCE | LINK | LANGUAGE | ENGLISH |


How to configure and use VisualWGET (wget-GUI-based download manager) – HeelpBook – http://heelpbook.altervista.org/?p=35344 – 08/01/2013 – 16:50 – Visit http://www.heelpbook.net OR http://mobile.heelpbook.net on your tablet! #HeelpBook @HeelpBook