 --> (Word) --> (Word) |  --> (PDF) --> (PDF) |  --> (Epub) --> (Epub) |  --> (Text) --> (Text) |
 --> (XML) --> (XML) |  --> (OpenOffice) --> (OpenOffice) |  --> (XPS) --> (XPS) | |
| This article has been published [fromdate] | |||
| [readtime] | |||
Every DBA needs to transfer data between tables. This is the kind of task that comes up all the time. Not only do DBAs need to know how to transfer data between two tables on the same server, but they will also need to know how to do it from one server to another. This article will look at a number of different methods to transfer data from one table to another.
The INSERT INTO Method
This method, as the heading suggests, uses the INSERT INTO T-SQL statement to move records from one table to another. This method is one of the easiest methods of transferring data. This method can not only be done between tables on the same server, but can also be done across [gs server]s.
To use this method, all you have to do is code an INSERT INTO statement that identifies the target table, and uses a SELECT statement to identify the data you want to copy from the source [gs table]. Let me show you an example.
Say you have two tables TABLE1, and TABLE2, where both tables have exactly the some table structure and are in the same [gs database]. In this case, to copy all the rows from TABLE1 to TABLE2 you would use the following INSERT INTO statement:
INSERT INTO TABLE2 SELECT * FROM TABLE1
Now suppose you do not want to copy all the rows, but only those rows that meet a specific criteria. Say you only want to copy those rows where COL1 is equal to "A". To do this you would just modify the above code to look like this:
INSERT INTO TABLE2 SELECT * FROM TABLE1 WHERE COL1 = 'A'
See how simple it is to copy data from one table to another using the INSERT INTO method? You can even copy a selected set of columns, if you desire, by identifying the specific columns you wish to copy and populate, like so:
INSERT INTO TABLE2 (COL1, COL2, COL3) SELECT COL1, COL4, COL7 FROM TABLE1
The above command copies only data from columns COL1, COL4, and COL7 in TABLE1 to COL1, COL2, and COL3 in TABLE2.
This method can also be used to copy data from one database to another.
To do this you just need to fully qualify (<database>.<owner>.<table name>) the source and target table names on the INSERT INTO statement to identify which database you want to use.
You can copy data from one server to another the same way by using fully qualified [gs linked server] names (<linked_server>.<database>.<owner>.<table_name>).
The DTS Import/Export Wizard method
Another method to copy data between tables is to use Data Transformation Services (DTS). The easiest way to do this is to use the DTS Import/Export Wizard.
You start the DTS Import/Export Wizard by opening up Enterprise Manager, highlighting one of your registered servers, clicking on the "Tools" menu, mouse over the "Data Transformation Services" item in the drop down, and then clicking on either "Import Data..." or "Export Data...".
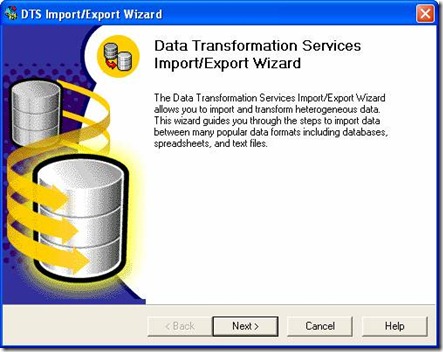
Once you have done this, you should see the following wizard main menu:
To start specifying your data transfer criteria, click on the "Next >" button on the main menu. Doing this will bring up the following window:
On this screen, you need to specify the source server, [gs database] and [gs login] needed to access the data that you want to copy. Once you have specified those items, then click on the "Next >" button.
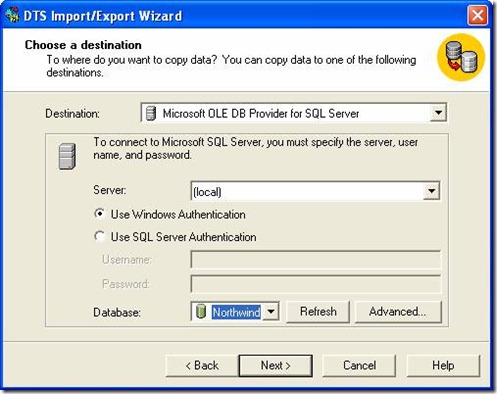
Doing this will bring up the following window:
On this screen, select the destination server where you want to copy the data, and enter the [gs login] information and database where you want the data to be placed. You can specify a local server, as I did above, or any server that you can connect to from your client machine.
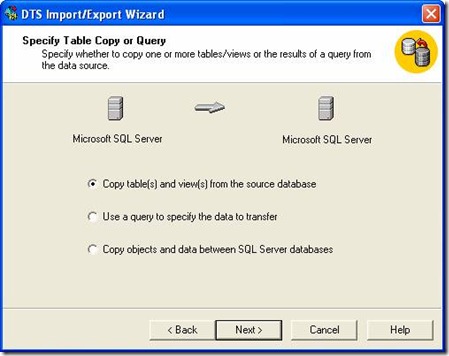
Once your target information is completely entered, click on the "Next >" button. Doing this will bring up the following [gs popup] window:
Since my example will be copying all the data in a single table having the first radio button selected is appropriate. After the first radio button is selected you then click on the "Next >" button. Doing this brings up the window below:
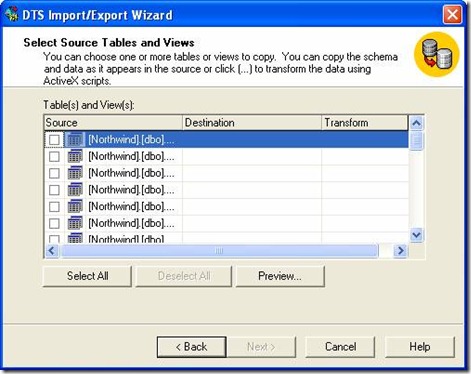
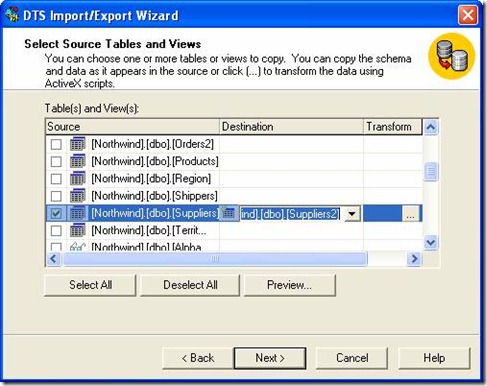
On this window, you specify the "Source" table you want to copy; you do that by clicking on the check box next to the name. Once you check a source table, you are then allowed to enter the Destination Table information.
As you can see from the window above I selected the Northwind.dbo.Suppliers table, as my source table and I specified that the target table would be a new table called Suppliers2, which will be created in the same database. Under the "Transform" column you can see there is a button that contains three dots ("...").
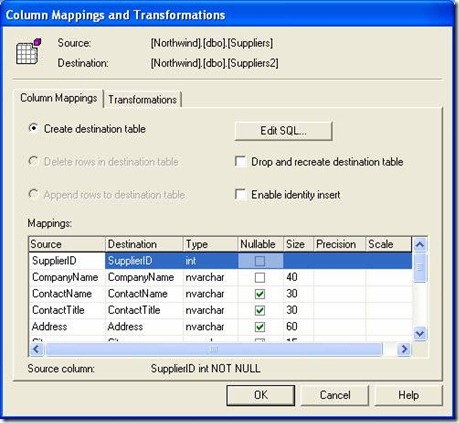
This button is used to specify any transformation characteristics you desire for the given data transfer. When you click on this button, the following window is displayed:
Here you can see my transformation will create the destination table. The "Mappings" display shows the layout for the new destination table. By default, when creating a destination table, these mapping columns will be the same as the source table. You can change the column characteristics here if you desire. You can also click on the "Edit SQL..." button to modify the "CREATE TABLE" statement that will be used to create the destination table.
The "Transformations" tab is used to modify the Visual Basic code that will perform the actual data movement from the source table to the destination [gs table]. Modifying the Visual Basic code is sometimes useful in manipulating your data as it is moved.
Note that if you where transferring data to an existing table in your destination database then the "Delete rows in destination table" or "Append rows to destination table" radio buttons would not be grayed out. Once you have specified all the transformation information you desire then click on the "OK" button, which will take you back to the "Select Source Tables and Views" window above.
To continue with specifying your data copy criteria in the wizard click on the "Next >" button; doing this brings up the following window:
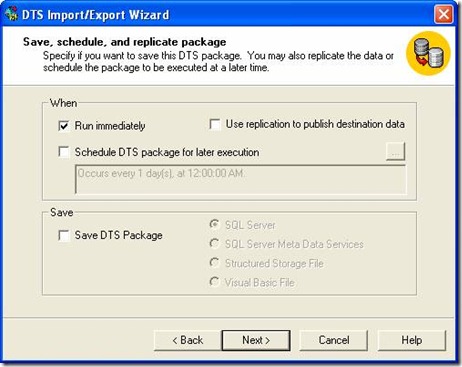
Here you can run the data copy immediately, schedule the data copy to be run at some scheduled time, or just save your data copy specification as a DTS package. Typically if I am just migrating data, it is normally just a one-time kind of data copy, so I use the "Run immediately" option.
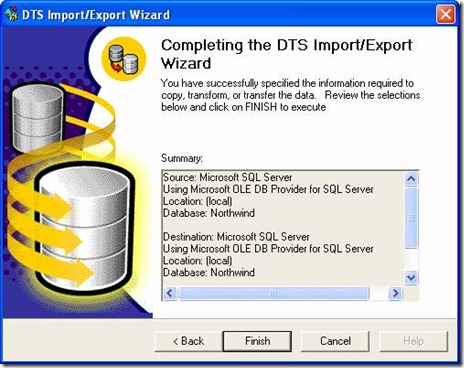
When you click the "Next >" button you will get the following final DTS Import/Export Wizard window:
Here you can review the "Summary" information to make sure your copy specifications are correct. If they are not, then you can use the "< Back" button to correct your specification. If you are satisfied with your copy specifications, click on the "Finish" button to complete the wizard. As you can see, the DTS Wizard has lots of different options to allow you to copy data from one source table to another.
The BCP/Bulk Insert Method
This method copies data from the source to the destination table in a two-step process. The first step is to use BCP to output the data in the source table into a text file. The second step then uses the BULK INSERT command to insert the records into the destination table from the text file. Let me go through an example for you.
Let's do a similar example as we did with the DTS Import/Export Wizard, except I am going to copy the Northwind.dbo.Orders table to a table named Northwind.dbo.Orders2 on the same server.
The first step of this process is to BCP the data out. BCP is a command line utility. It can be executed from Query Analyzer by using the extended stored procedure "xp_cmdshell", to submit the BCP command to the Windows [gs command shell].
To accomplish this you would run the following code in Query Analyzer:
execute xp_cmdshell 'bcp Northwind.dbo.Orders out c:\temp\Orders.txt -Sgalser01 -T -n'
This BCP command exports all of the Northwind.dbo.Orders table to a flat file named c:\temp\Orders.txt. The "-S" options identifies the server where the data will be exported from, in this case "galser01". The "-T" option says make a trusted connection. The "-n" option tells BCP to write the data in native format.
After creating a text file using the above BCP command, you can then turn around and load the data into Northwind.dbo.Orders2 table using the code below:
select * into Northwind.dbo.Orders2 from Northwind.dbo.Orders where 1=2
bulk insert Northwind.dbo.Orders2 from 'c:\temp\Orders.txt'
     with (DATAFILETYPE  = 'native')
The first command in the script above, the SELECT statement, creates an empty Orders2 table on the Northwind database. This is needed, because BULK INSERT requires that the target table exists, otherwise it gets an error. The BULK INSERT statement above identifies the target table "Northwind.dbo.Order2", and in the FROM clause it identifies the data file to be loaded, in this case "c:\temp\Orders.txt".
The last parameter specified is DATAFILETYPE, which identifies that the input file will contain data in native mode.
Once again, this example only moves data from one table to another in the same database. This same technique can be used to move data from one database to another or one server to another. In addition, there are other options that can be used with BCP and BULK INSERT to output and input your data using a different mode than native.
Conclusion
As you can see, there are a number of ways to move data from one table to another. Some options are better then others, depending on what data is being moved, and the volume. The INSERT INTO method is not very fast for large amounts of records, where as the BCP/BULK INSERT method can quickly load large volumes of records.
If you prefer a GUI driven method, then the DTS Import/Export method is for you. There are other methods out there that you could use, but these three should provide you with alternatives depending on your data movement criteria.
SOURCE | LINK (Databasejournal.com) | LANGUAGE | ENGLISH |
