[wpfilebase tag=file id=8]
[wpfilebase tag=file id=9]
[wpfilebase tag=file id=10]
One of the biggest problems in maintaining "good" data is the entry of dates. People seem to get confused about entering dates. Should they enter dd/mm/yy or mm/dd/yy? Do they enter slashes or dashes or dots? And what was the date of the third Thursday in September last year anyway? What you really need is a calendar!
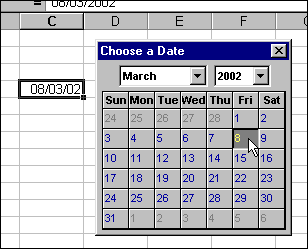
This tutorial shows you how to create a pop-up calendar using the Microsoft ActiveX Calendar Control that is installed with Excel. The user will be able to call up the calendar with a keyboard shortcut, from a toolbar button or menu, or from the right-click context menu. When the user selects a date it is automatically entered into the active cell on the worksheet...
Where Does the Code Go?
The code that creates and operates the calendar has to reside inside an Excel file. The question is which one? If you want the pop-up calendar to be available whenever you are working in Excel you should create it in Personal.xls, sometimes referred to as your Personal Macro Workbook, because this files exists to store code that you want to be available to all your Excel files. Personal.xls opens and is hidden each time Excel is started. Any macros and functions it contains are then available for use in any other workbook.
Alternatively, you could create your pop-up calendar in a specific workbook. It would be available whenever (and only) when that workbook was open, but also available to any other workbook that was open at the same time.
In this tutorial I will be using Personal.xls but if you choose to put your pop-up calendar somewhere else you can still follow the same instructions.
If you want to distribute your calendar, you should consider saving it as an Excel Add-In. Alternatively you can download a ready-made Pop-up Calendar Add-In at the bottom of this page.
Prepare the Workbook (Personal.xls)
You can miss out this step if you want to store your calendar in a different workbook. Otherwise, start Excel and go to:
Tools > Macro > Visual Basic Editor
(Keys: Alt+F11) to open the Visual Basic Editor.
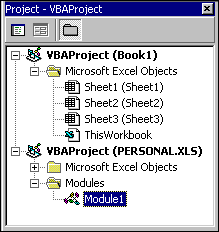
First you need to check if a copy of Personal.xls already exists. If there isn't one you will have to create one (it's quite easy!). Look at the Project Explorer window (normally on the upper left of the Visual Basic Editor window).
If you can see VBAProject (PERSONAL.XLS) you already have a copy. If there is no Personal.xls then you need to could create one. Here's a quick way to do it...
Switch to Excel and go to Tools > Macro > Record New Macro. When the Record Macro dialog box opens chooseStore Macro in: Personal Macro Workbook, click <OK>, then click the Stop Recording button (the one with the small blue square) on the macro recording toolbar. This procedure forces Excel to create a copy of the Personal.xls file.
Switch back to the Visual Basic Editor and use the Project Explorer to navigate to Module1 in Personal.xls. Double-click it to open the code window where you will see the macro you just recorded. Select the lines from Sub Macro1() to End Sub and press the [DELETE] key to remove it.
Build the Calendar and Write its Code
Step 1: Insert a New UserForm
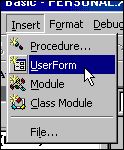
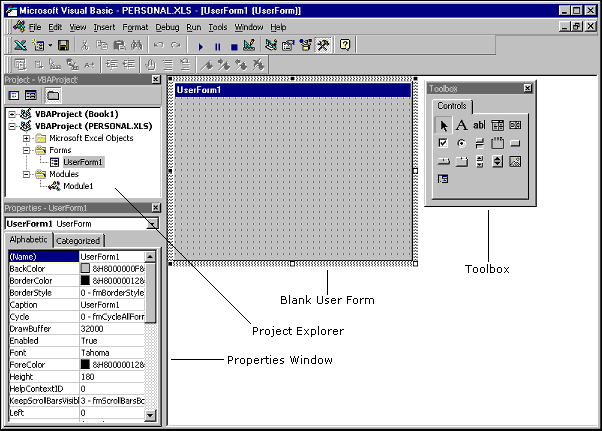
The calendar is going to be displayed on a VBA UserForm. In the Project Explorer click onVBAProject (PERSONAL.XLS) then go to Insert > UserForm to open a new blank UserForm [click the thumbnail below to see a full-sized image of the Visual Basic Editor window]...
Make the following changes in the Properties Window...
Name: frmCalendar
Caption: Select a Date
Step 2: Locate the Calendar Control Tool
You need to draw a Calendar Control (active objects on forms are called "controls") on the UserForm, but the one you need is not normally included in the Toolbox. To install it, first make sure that the Toolbox is visible. If it isn't, switch it on with View > Toolbox. Then go to Tools > Additional Controls. In the dialog box find Calendar Control 8.0 (for Excel 97 and 2000, Calendar Control 10.0 for Excel 2002) and select it. Click the <OK> button to close the dialog. This adds a new button to the toolbox, labelled Calendar.
NOTE: The Calendar Control is an ActiveX control (actually a file called mscal.ocx) supplied with Microsoft Office. It is normally installed with a standard installation of Microsoft Office Professional or Microsoft Access, but if you can't find it on the list you will need to get hold of a copy. If you are distributing your file, or planning to use it on more than one computer, you will also need to make sure that the host computer has the mscal.ocx file installed. You will find it on the CD that your copy of Microsoft Office Professional came on, or you can download a copy from here.
Step 3: Add a Calendar Control to the UserForm
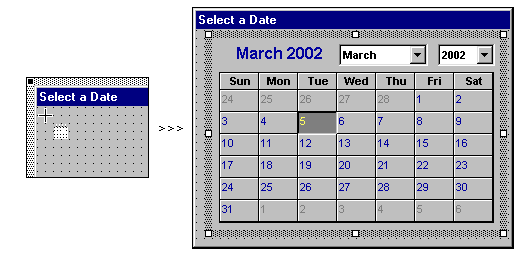
Click the Calendar tool then click on the UserForm near its upper left corner to place a calendar on the UserForm.
Make sure the calendar is selected then take a look at the choices in the properties window. Click on the Custom category (near the top of the list) and click the[...] button to open the calendar control's custom properties dialog. You can format the calendar any way you like. I made the following changes...
General - Show Month/Year Title: No
Font - DayFont Size: Size 8, Not Bold
Font - GridFont: Size 8
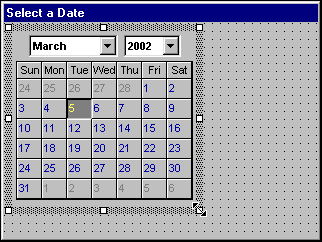
Omitting the title and making the text smaller allowed me to resize the calendar to a smaller rectangle by dragging the resize handles (white rectangles)...
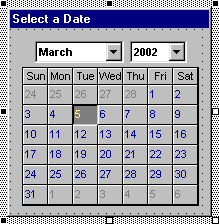
Now click on the UserForm itself so that you can see its resizing handles and resize it to fit the calendar...
To get a preview of how the calendar will look click the F5 key. When you do this the UserForm will open in Excel as it would in use. Click the UserForm's close button ([x]) to return to the Visual Basic Editor.
Step 4: Add a Command Button
If the user opens the calendar by mistake, they will be able to close it by clicking the [x] button without entering a date on the worksheet. Most users also expect a form or dialog box to close without making changes if they press the [ESCAPE] key on their keyboard.
This doesn't happen by itself.
You have to program the UserForm to respond to this event. To do this you will place a command button on the UserForm which closes it when clicked. By setting the button's Cancel property to Yes the effect of the user hitting the [ESCAPE] key will be to programmatically click the button. The user doesn't need to see the button, so you can hide it behind the calendar.
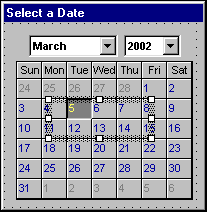
Click the Command Button tool on the toolbox then click on the calendar (just left of centre) to place a command button on the UserForm. Note that the command button places itself behind the calendar by default, although you can still see its outline when it is selected...
With the command button selected, make the following changes in the properties window...
Name: cmdClose
Cancel: True
Step 5: Write Code for the Command Button
This step adds some code to the Click event of the command button so that when clicked (i.e. when the user hits the [ESCAPE] key) the UserForm closes without anything else happening.
Go to View > Code (Keys: F7) to open the UserForm's code window.
If the command button was still selected there will already be an entry. If not, choose cmdClose from the left hand (General) drop-down list at the top of the code window. It should automatically select Click from the right-hand (Declarations) list.
Place your cursor between the Sub... and End Sub lines and press the [TAB] key to indent your code. Type Unload Me. Your line of code will look like this:
Use [CTRL]+[TAB] (or go to Window > frmCalendar(UserForm)) to switch back to the UserForm window and test the code. Press [F5] to open the form in Excel. Notice that the command button is invisible (it is behind the calendar). Press the [ESCAPE] key and see that the UserForm closes.
Step 6: Write Code for the Calendar
This step builds the code that will transfer the date that the user chooses to the active (selected) cell on the worksheet.
Return to the UserForm's code window. Open the left-hand (General) drop-down list at the top of the code window and choose Calendar1. If it is not already selected, choose Click in the right-hand list. This enters the start and end lines of the Calendar1_Click procedure.
Place the cursor between the two lines and press [TAB] to indent your code (indenting blocks of code is good practice - it makes the code easier to read) then type:
ActiveCell.Value = Calendar1.Value
...which transfers the date selected on the calendar to the active cell. On the next line type:
Unload Me
...which closes the form. Your code should look like this:
To make the calendar a bit more user-friendly you will now add some code that checks to see if the active cell already contains a date. If it does, then the calendar will show the same date when it opens. If there is no date in the cell (or if what is in the cell isn't a date) the calendar will show today's date. To do this we make use of the UserForm's Initialize event, which happens as the UserForm opens.
Open the left-hand drop-down list at the top of the code window and choose UserForm, then open the right-hand list and choose Initialize. (You will notice that when you chose "Initialize" the start and end lines for the UserForm_Click procedure were created. You don't need these so it is safe to delete them.)
Place your cursor between the start and end lines of the UserForm_Initialize procedure and type the following:
      If IsDate(ActiveCell.Value) Then
            Calendar1.Value = DateValue(ActiveCell.Value)
      Else
            Calendar1.Value = Date
      End If
This IF Statement checks the active cell for a date. If it is a date then the calendar displays the same date. If not it uses the VBA Date function to display the current date. Your completed code should look like this:
Now you need to write some code to display the UserForm on demand. If you had to create Personal.xls you will already have a code module (Module1). Otherwise, or if you are using a different workbook, go to Insert > Module to create one. Double-click the name of the module in the Project Explorer window to open its code window (or right-click it and choose View Code).
Type the line Sub OpenCalendar and press enter. The Visual Basic Editor places a pair of brackets at the end of the line and adds the line End Sub, placing your cursor between them. Press [TAB] then type frmCalendar.Show. Your code should look like this:
This simple procedure will display the UserForm when run from Excel.
Step 7: Test the Code
At this point it is a good idea to save your file in case something goes wrong! In the Visual Basic Editor window go to File > Save PERSONAL.XLS (or whatever your file is called).
Switch to Excel and select an empty cell in which to enter a date. Go to Tools > Macro > Macros (Keys: Alt + F8) to open the Macro dialog. Make sure that the macro PERSONAL.XLS!OpenCalendar is selected and click <Run>.
When the calendar opens it will display today's date. Choose a date (NOTE: always choose month and year before choosing day because clicking on a day fires theCalendar1_Click event). When you click the day the calendar closes and enters your date into the cell.
Now select a cell that already contains a date and run the macro. When the calendar opens it displays the date that was already in the cell. If you wish you can choose another date, or you can press the [ESCAPE] key to close the calendar without making any changes.
Adding Extra Features
Adding a Toolbar Button or Menu Item:
A useful addition is a toolbar button and/or menu item that lets the user call the macro that opens the UserForm. They don't need to know that they are calling a macro - they will just be using your new Insert Date tool!
To create a toolbar button:
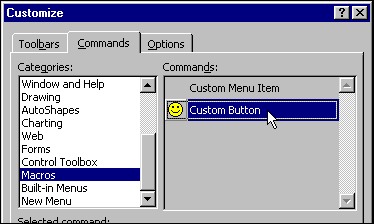
Go to View > Toolbars > Customize and choose the Commands tab on the Customize dialog. In the left-hand window scroll down to Macros and select it. You will see two items in the right-hand window, one for a new button and the other for a new menu item.
Drag Custom Button from the dialog box to a position on one of your toolbars then release the mouse button to place the new button on the toolbar. You can rearrange and edit your toolbars and menus as much as you want when the Customize dialog is open...
You must link the button to the macro, and you will probably want to change its image too:
- Right-click the button and enter some text (such as Insert Date) in the text box next to Name, then press [ENTER]. This text will be the tool-tip that the user sees when they point at the button.
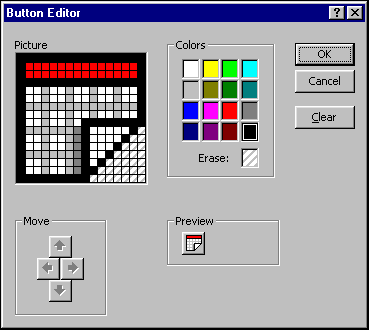
- Right-click the button and choose Edit Button Image. This is the fun part. I'll leave it up to you to figure out how to use this tool, but I can guarantee endless hours of amusement!
- Right-click the button and choose Assign Macro, choose the name of your macro (in this case PERSONAL.XLS!OpenCalendar) from the list, and click<OK>.
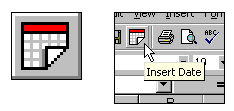
Here's what my button looks like:
Make any other changes you want and click <Close> on the Customize dialog box. You can now test your button. When you click it the UserForm will open and you can insert a date.
To create a new menu item:
Open the Customize dialog as in the previous step and select the Macros category. This time drag Custom Menu Item from the dialog box to one of your menus, but don't release it yet. The menu will open and allow you to place your new menu item wherever you choose.
- Right-click the menu item and enter some text (such as &Date) in the text box next to Name, then press [ENTER]. This text will be the title of the menu item. The ampersand (&) does not appear itself but causes the following letter to be underlined (i.e. Date). This allows users to select the menu item by using their keyboard.
- You can have a button image too if you want. I used the same image as for my custom button. To do this right-click on the button and choose Copy Button Image then right-click on the menu item and choose Paste Button Image.
- Right-click the menu item and choose Assign Macro, choose the name of your macro (in this case PERSONAL.XLS!OpenCalendar) from the list, and click <OK>.
Here's how it looks...
Close the Customize dialog box and test your menu item.
Assigning Keyboard Shortcut
You can also assign a keyboard shortcut. There are two ways to do this. You can do it manually or have the workbook assign a shortcut when it is opened. The advantage of the latter method is that, if the calendar is contained in its own workbook, the shortcut applies only when the workbook is open. It also means that the shortcut is applied automatically on which ever computer the file is being used - handy for files that are being distributed and for add-ins too.
To assign a shortcut manually:
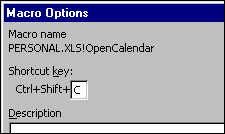
In Excel go to Tools > Macro > Macros to open the Macro dialog. Select the name of your macro (in this case PERSONAL.XLS!OpenCalendar) then click the<Options> button. This lets you assign a keyboard shortcut and an optional description to a macro.
Assign the shortcut by clicking in the small white box and typing the key combination you want to use. In the illustration below I have assigned the shortcut [CTRL]+[SHIFT]+[C]....
To assign a shortcut with code:
In the Visual Basic Editor find the This Workbook entry for PERSONAL.XLS (or your chosen workbook) in the project explorer and double click it (or right-click and choose View Code) to open its code window. Open the left-hand (General) drop-down list at the top of the code window and choose Workbook. This creates the start and end lines for the Workbook_Open procedure. This is a special macro that runs automatically whenever the workbook is opened. Between the start and end lines type the line:
Application.OnKey "+^{C}", "Module1.OpenCalendar"The + sign signifies Shift, the ^ signifies CTRL and {C} signifies the letter C. You can use any key combination you like. Your code should look something like this:
You will need to save and close the workbook and then reopen it before you can try it out. If you are using PERSONAL.XLS you will need to close Excel and reopen it. Save the file first!
Adding the Calendar to the Shortcut Menu
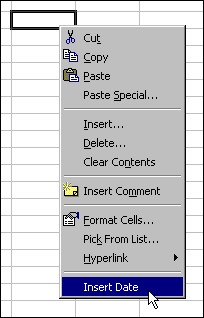
Using VBA you can add custom items to shortcut menus (the menu you see when you right-click on something, sometimes called context menus). Here's how to add an item to the "Cell" shortcut menu (the one which appears when you right-click on a worksheet cell). The menu item will call the macro that opens the calendar's UserForm.
Is is a good idea to place the code that creates the shortcut menu item in the Workbook_Open macro, so that the menu item is added whenever the workbook is opened. But to ensure that the item appears only once (the menu item is persistent - a duplicate would be created each time you opened the file!) you should also create a procedure to remove the menu item when the file closes. To do this you can create a Workbook_BeforeClose macro, which runs automatically when its host workbook closes.
Code to create the new shortcut menu item:
If you have created a keyboard shortcut with code (in the previous step) you will already have a Workbook_Open macro. If not, create one as described above (you can omit the line that assigns a keyboard shortcut if you want).
Add lines to the Workbook_Open procedure as follows:
If necessary, make an empty line above the existing code, and enter as the first line the variable declaration:
Dim NewControl as CommandBarControl
The next line of code, which can be entered below your shortcut key code, tells Excel that the variable is a new item (or control) to be added to the right-click menu of a cell:
Set NewControl = Application.CommandBars("Cell").Controls.AddNow some code to describe the new item:
With NewControl

.Caption = "Insert Date"
.OnAction = "Module1.OpenCalendar"
.BeginGroup = True
End With
The Caption is the text which appears on the menu, and can be anything you want. Make sure that OnAction correctly specifies your macro's name and location. The optional BeginGroup puts a separator line above the new item on the menu. Your finished code should look like this:
Here's how the resulting shortcut menu looks:
Code to remove the new shortcut menu item:
This procedure reverses the action of the code in the previous step. This is necessary because items added to the shortcut menu will remain there even when the workbook that created them is not open. Choosing the shortcut would then result in an error (although not a serious one... the user would see a message to the effect that Excel couldn't find the macro). Also, because the workbook creates the menu item as it opens, you would end up with several copies of the item if you didn't remove it as the workbook closed.
In the same module as the Workbook_Open procedure use the drop-down lists to create a Workbook_BeforeClose procedure. Enter the line:
On Error Resume Next
...which tells Excel to ignore any error that might occur (i.e. if it tries to remove the menu item but can't find one). Then enter the line:
Application.CommandBars("Cell").Controls("Insert Date").Delete...which removes your item from the shortcut menu of a cell. Your finished code should look like this:
TIP: If you should find yourself with unwanted copies of custom menu items on the shortcut menu (because, like me, you wanted to test the first procedure before you created the second one!). You can give the instruction from the Visual Basic Editor's Immediate Window (go to View > Immediate Window or Keys: CTRL+G). Click in the Immediate Window and type the line the starting Application... and ending ...Delete then press [ENTER].
Download the File
You can download a zip file containing a fully working example of the Pop-up Calendar as an Excel workbook (.xls) or as an Excel Add-In (.xla).
SOURCE | LINK | LANGUAGE | ENGLISH |
